© Copyright UAB “TableAir” 2023
All rights reserved.
We’re very excited to have you on board on TableAir Desk Booking System (DBS). While using our system you will be able to make your office a more dynamic and agile place to perform your daily tasks.
Sharing spaces brings some challenges: finding colleagues might be more difficult when they sit at different places, but we made sure you can easily find them using our website.
You’ll also notice sensors are attached underneath your desk, they are necessary to get the data about desk utilization. Your privacy is very important for us and if you choose to not be found/identified we have a way to do that as well.
Before going to work, simply check which desks are not booked, sit down if the traffic light glows green, the sensor will pick up the data that the desk is being used so no one else will be able to book it.
You will be able to make your booking with an App (iPhone, Android), identify with a Bluetooth connection and do the same and more on the Web platform.
To start booking, please follow the instructions provided below.
User Manual version history:
| Rev. 1.0 | 16th January 2018 | Initial document created. |
| Rev. 1.1 | 10th October 2018 | Updated traffic light status meaning. |
| Rev 1.2 | 25th September 2019 | Updated pictures, added new functionalities |
| Rev 1.3 | 4th December 2019 | Added WiFi indicator instructions, and kiosk usage instructions. |
| Rev 1.4 | 8th January 2020 | Added Meeting room and Guest screen usage instructions. |
| Rev 1.5 | 6th August 2020 | Added sanitation feature |
| Rev 1.6 | 26th January 2021 | Updated guest screen description (with PIN and with no PIN) |
| Rev 1.7 | 13th April 2021 | Added name change instructions with anonymous option, meeting creation instructions |
| Rev 1.8 | 21st May 2021 | Parking space booking instructions added |
| Rev 1.9 | 20th January 2022 | Login flow update added |
| Rev 2.0 | 8th March 2023 | Removed sanitation feature, Bluetooth update, and Bluetooth check-in. New app visuals. |
| Rev 3.0 | 22nd March 2023 | Added instructions for MS Outlook add-in installation. |
Usage instructions
Description
TableAir desk booking system can be accessed:
After the administrator sets up your company account, he will either send you a personal invitation or share a website link where to access the desk booking system. The registration process has to be completed via browser, you can use the app only after your account was activated on the website.
For example: if your company name is “acme” your company link will, most likely, be https://acme.tableair.com/, “apple” will use https://apple.tableair.com/ etc.
Creating your personal TableAir Cloud account
In order to connect to your company account, first your personal account has to be created. As described in the previous chapter you will either receive a personal email invitation, or will have to create your account manually.
When you receive a personal invitation to your mail inbox, open the email and click on the link. If it’s not active, simply copy and paste it into your browser address bar.

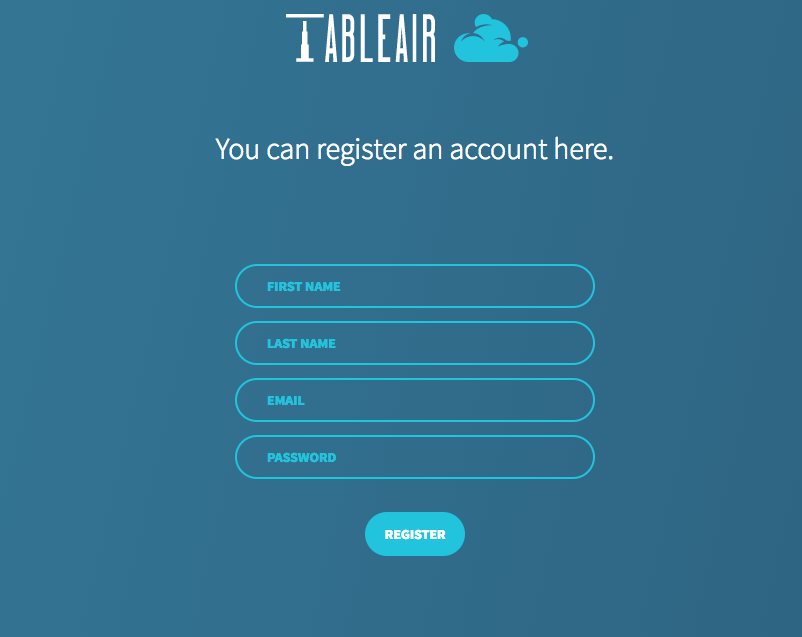
You will be prompted to the following page:

Fill in the details and click Register.
Normally you should have received an email invitation to join your team from the administrator. If you have not, please go to the following address https://cloud.tableair.com/registration/
Fill in the following form and click Register.
When you click Register the system will ask you to confirm your email address. In a few minutes, you will receive a confirmation email in your inbox. Please check your spam folder as well.
Open the email and click on the highlighted link.

Joining your team account
By this time you should have an active personal account. If you did not receive a personal invitation from the administrator, please go to your team URL – “teamname.cloud.com”
Click Request Access – Administrators will receive an email with information about your request, they’ll have to confirm your request. After they do you will be able to log in to your company account.
Logging in
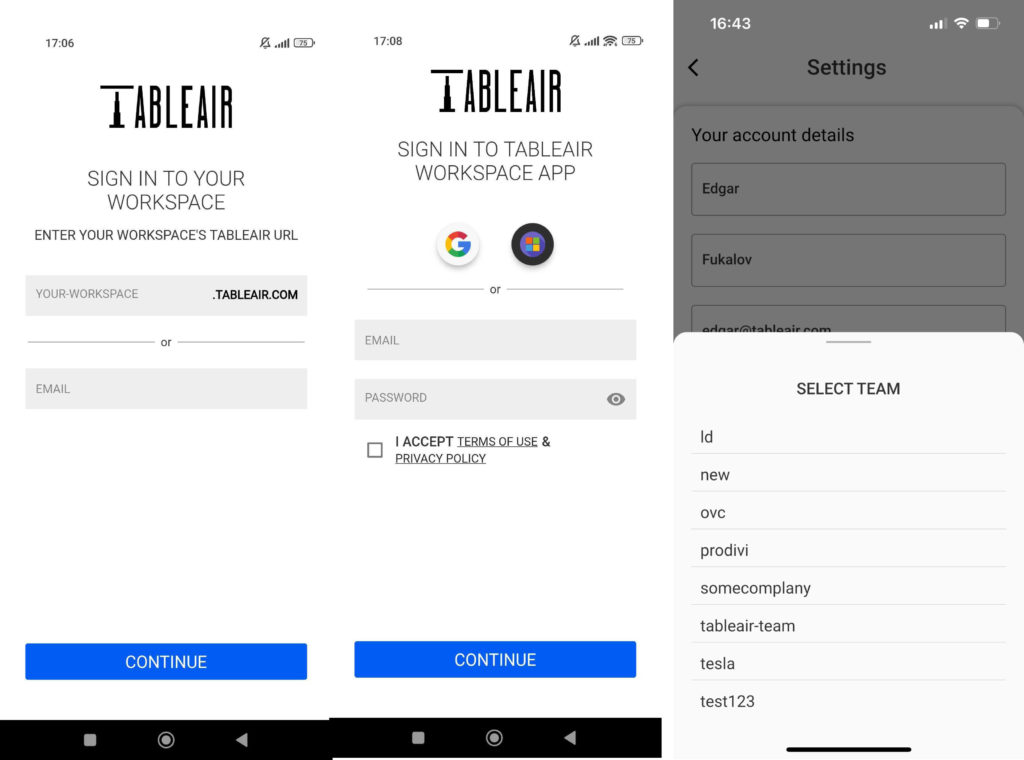
Once you have an account you can use it to log into your team. To do that you can go directly to your team URL address (i. e. mycompany.tableair.com) and use the options available there to log in:
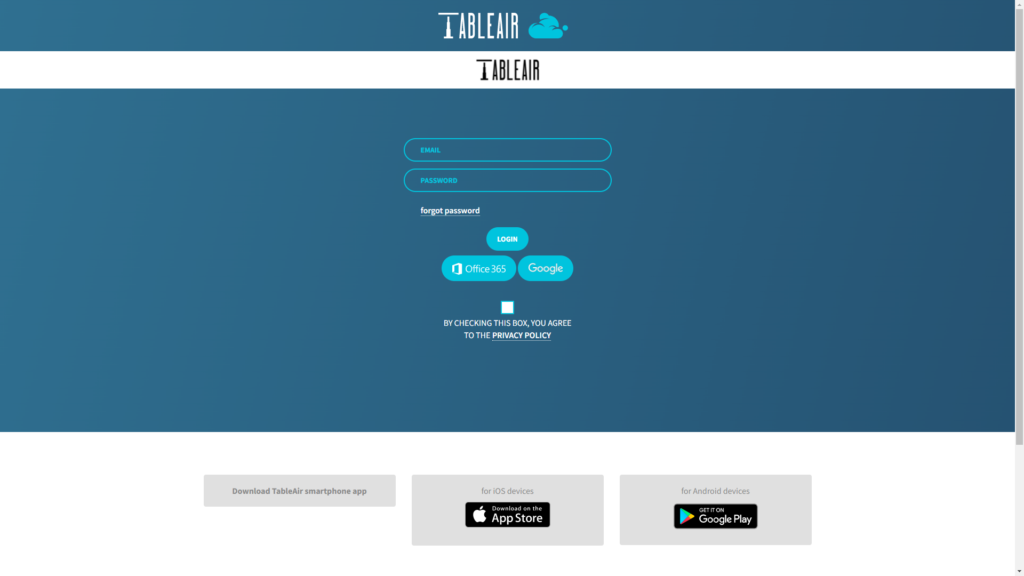
Note that the options available to you may differ based on what your account administrator has set up. Additionally, make sure to agree to our Privacy Policy, no matter which way you use to log in.
In cases when you do not know the URL of your team account, you can go to cloud.tableair.com/login, where you will see the following options:
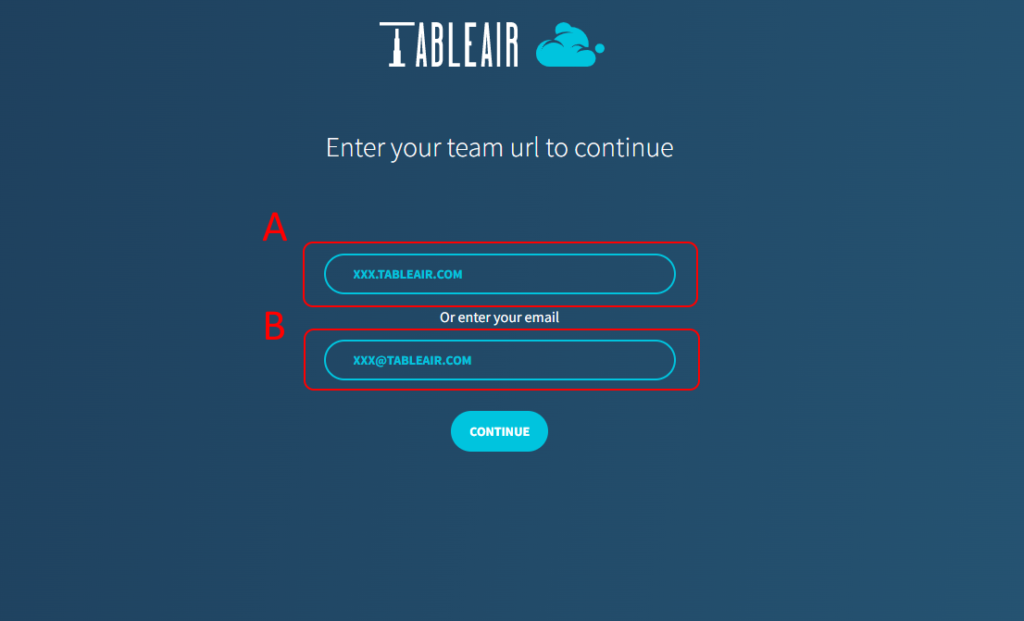
Here, you have two options.
A – you can enter your team URL, in case you do know it. Two formats are allowed: mycompany.tableair.com or simply mycompany
B – you can enter your email. Once you click Continue, if you belong to only one team, you will be redirected to your team’s login screen (as seen above). Once there, you can use the options available for you to log in. If, however, you belong to more than one team, you will be shown a selection of teams to which you belong.
Note that you only need to fill in one field.
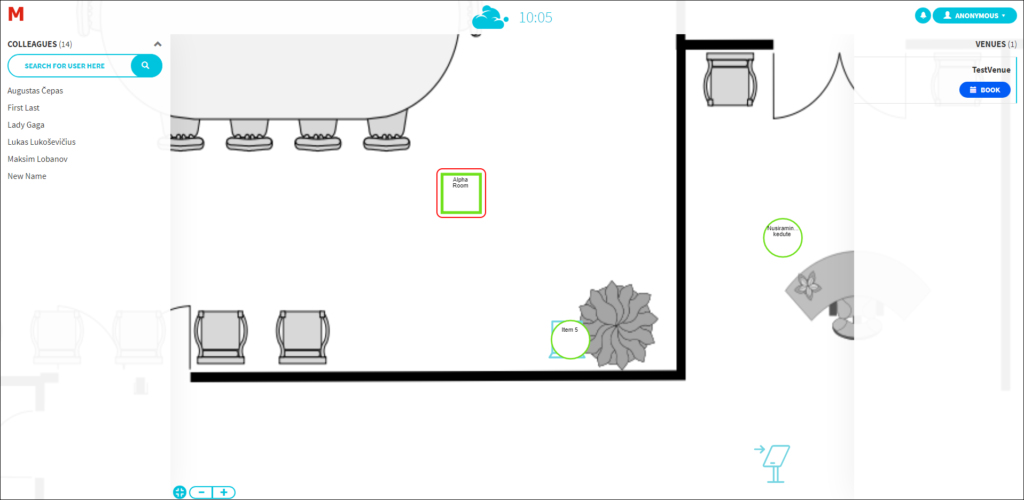
Introduction to the floorplan view
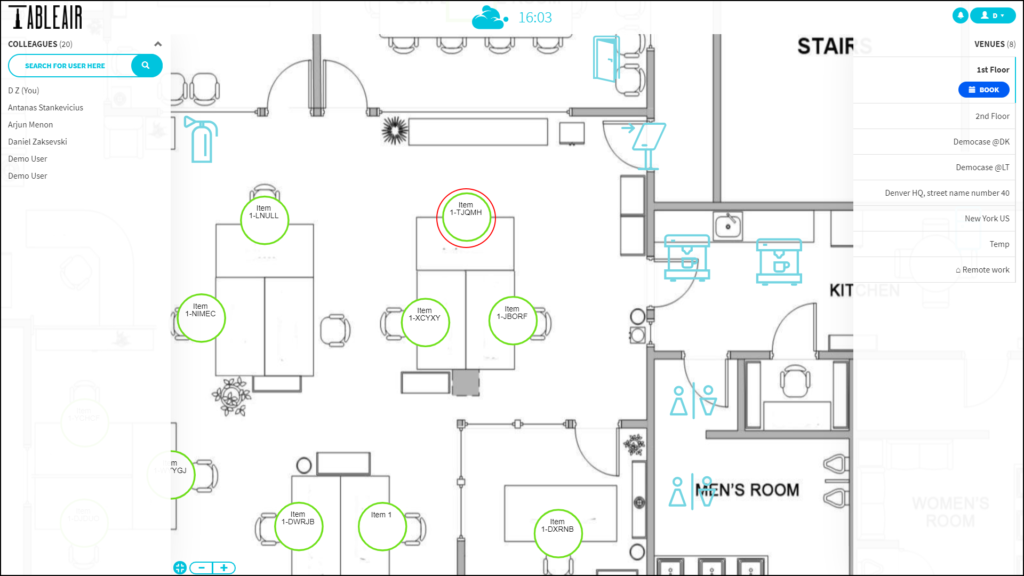
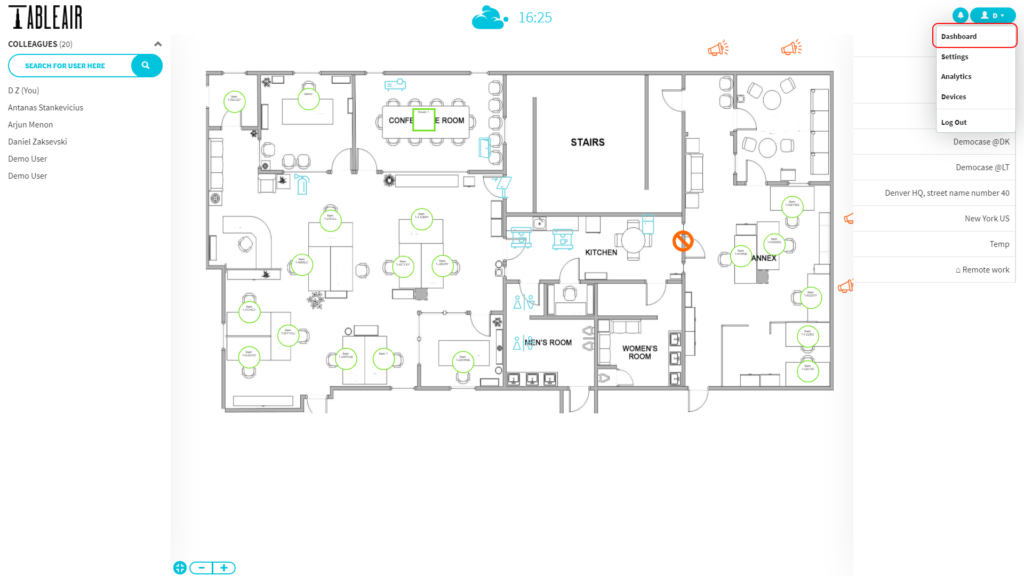
Upon signing in you will see a floor map view:

- A – colleagues module, here you will see a list of all your colleagues. If the green circle is glowing next to a colleague it means he/she is currently at the office. You can click on any of the colleagues’ names and the system will show you where he/she is sitting. Entering a name in the search bar will show you the person you are looking for.
- B – navigational buttons, zoom in or zoom out the floorplan, zoom out to view.
- C – this is a venue zone, you can switch between the venues, or use the minimap by dragging the field view.
- D – Local venue time.
Creating a desk booking on the web
When making a desk booking sometimes you don’t care where to sit, all you want is a vacant desk for a particular time, while at other times you want a specific desk and can be flexible with the time. TableAir desk booking system facilitates both functionalities. You can also find a video explanation below. First, let’s have a look when:
When you need to book a specific desk
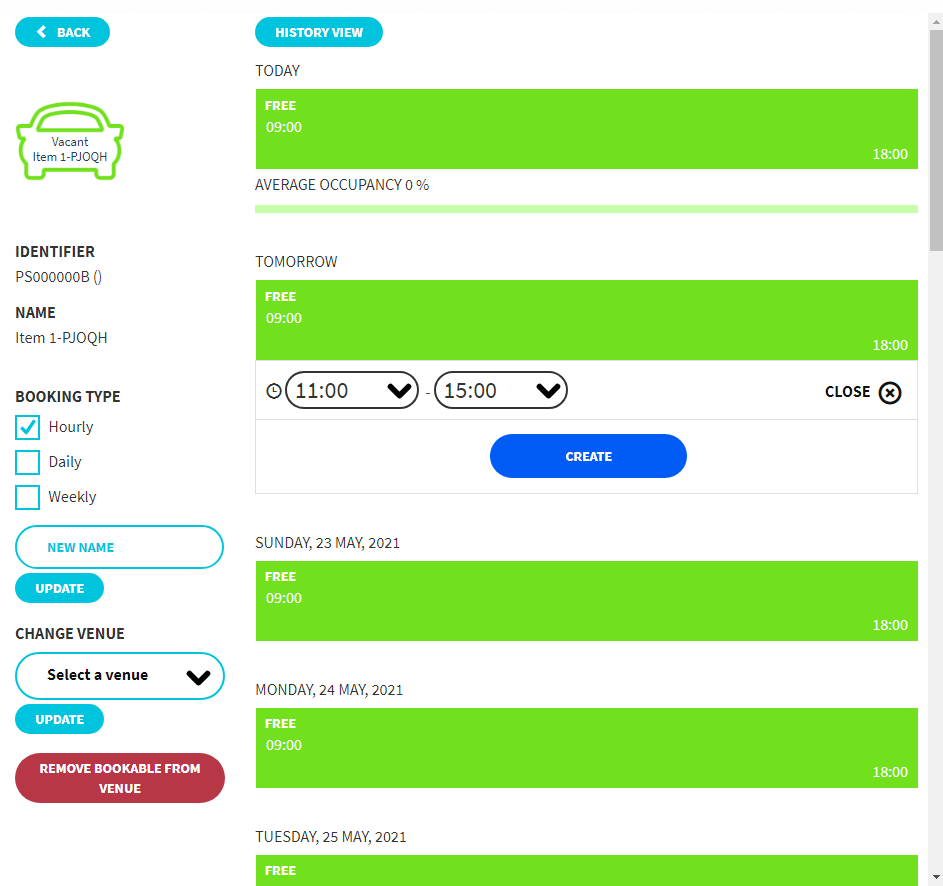
Once you’re logged in and have access to the account you can start making bookings. Click on the workspace you want to book (green circles) and its timeline will open on the right.
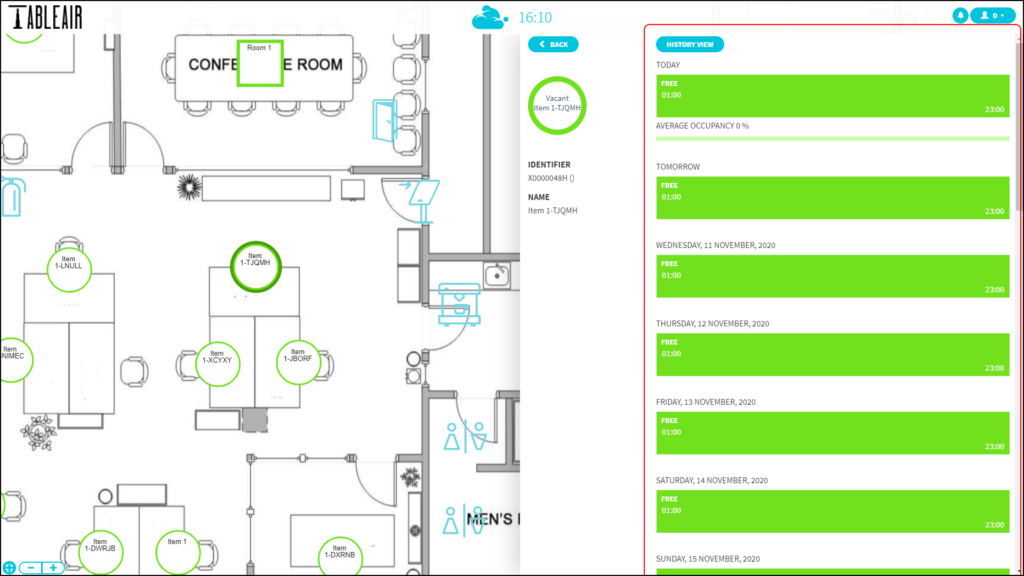
Click on the desired day on the timeline and select the exact hours you want your booking to start and end. To confirm, click Create
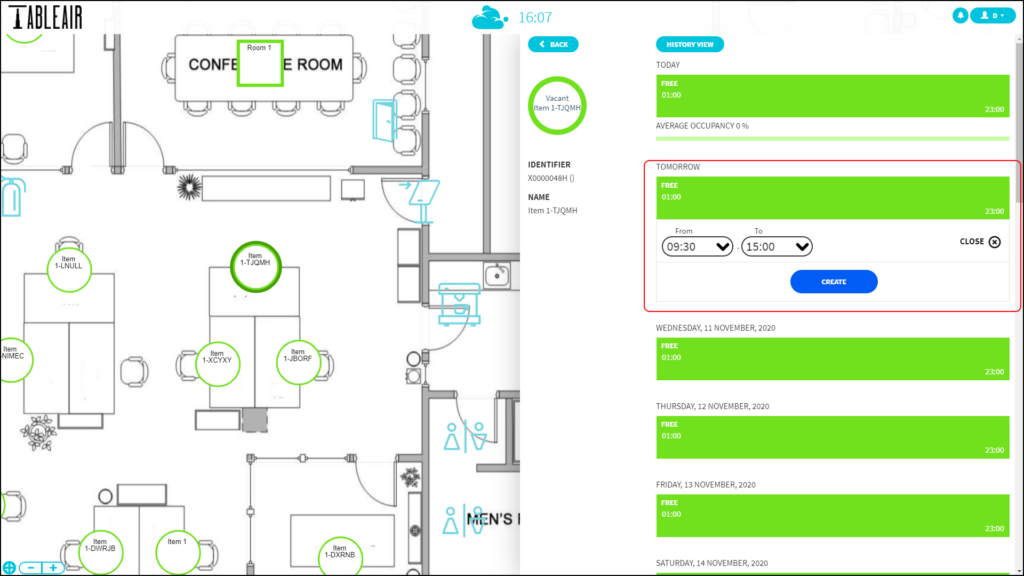
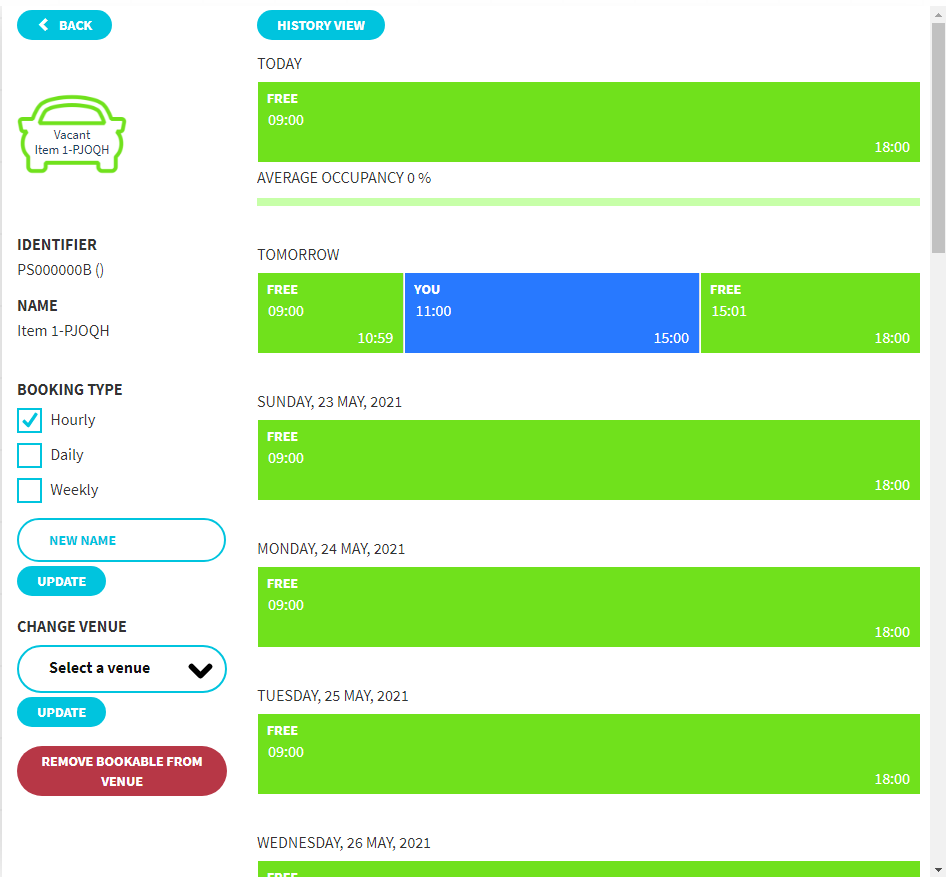
The booking will appear on the timeline, you can edit or remove it by clicking on it again.
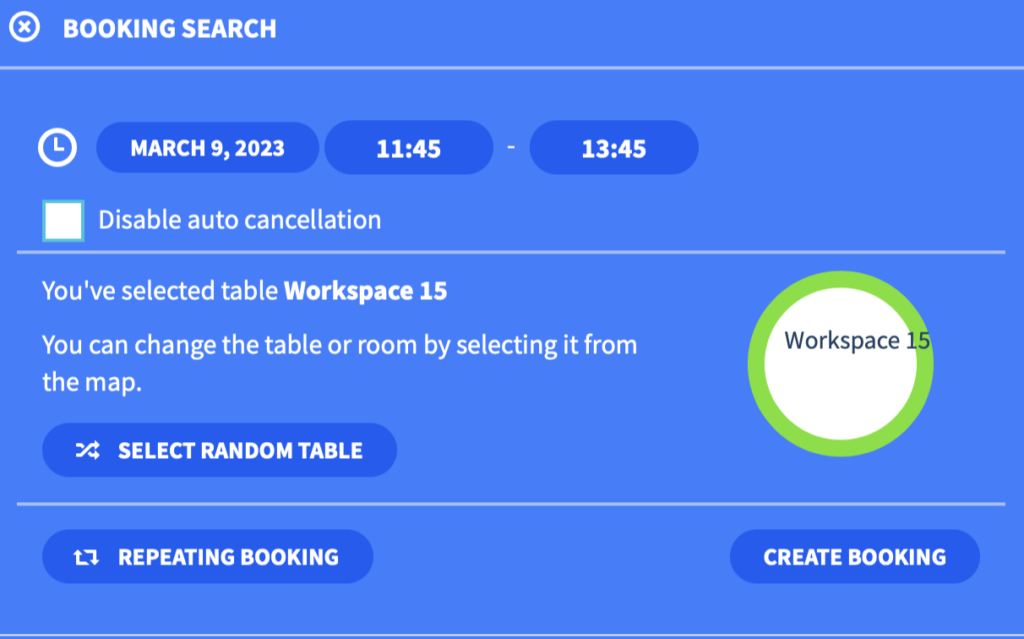
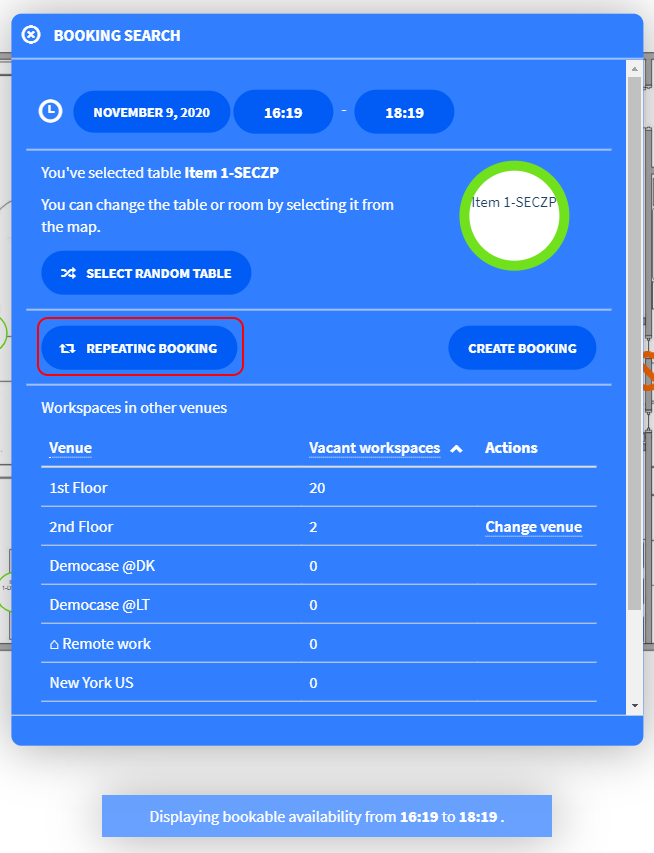
When you want a vacant desk for a particular time
Click on the Book button located on the right of the screen, a pop-up will appear on the floor map, you can move it around.
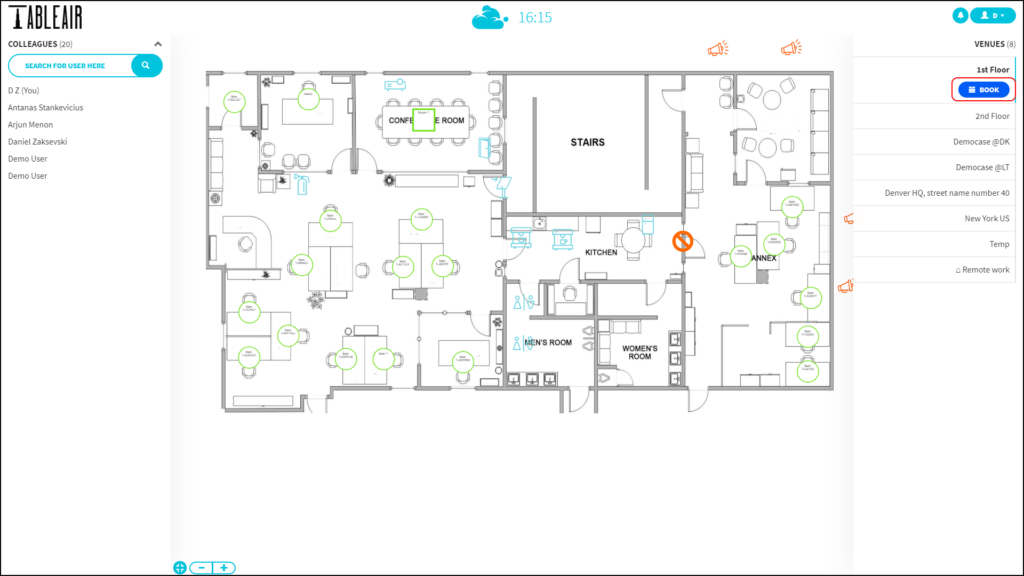
Select from and to times, floorplan will update to indicate which desks are still vacant for the selected time frame. You can click on any of the green workspaces, and click Create Booking to confirm it.
Video explanation:
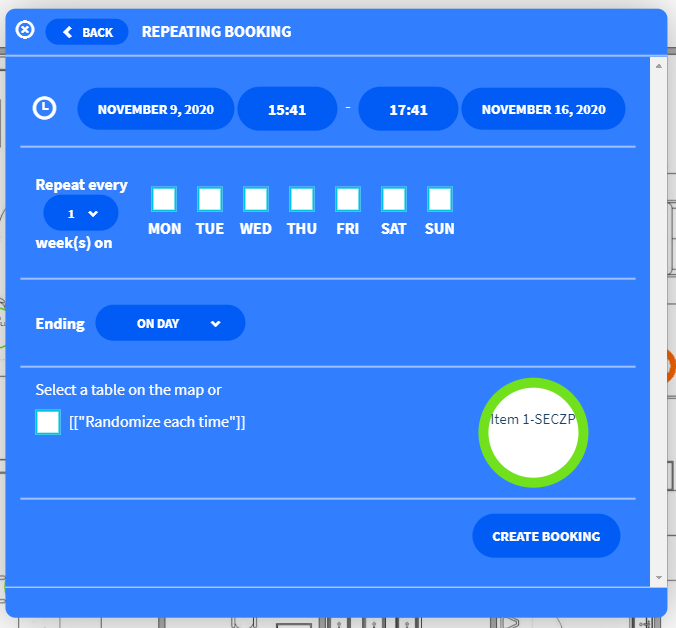
Repeating bookings
Sometimes you have to be at the office every Thursday. With our system, you can pre-book the desk by clicking repeating bookings, it will open the repeating booking popup.
Select one of the many options available and create a repeating booking. Please be cautious about how many bookings you do in advance, later on, you’ll have to remove them one by one.
Creating a meeting on the web
The same flexibility of desk bookings can be applied to meeting rooms. You can select a specific meeting room based on your needs, or if the time of the meeting is more important, you can filter the meeting rooms by time.
When you need to book a specific meeting room
Once you access the floor map, look for white squares with a green outline. These represent unoccupied meeting rooms. Click on the workspace and its timeline will open on the right.
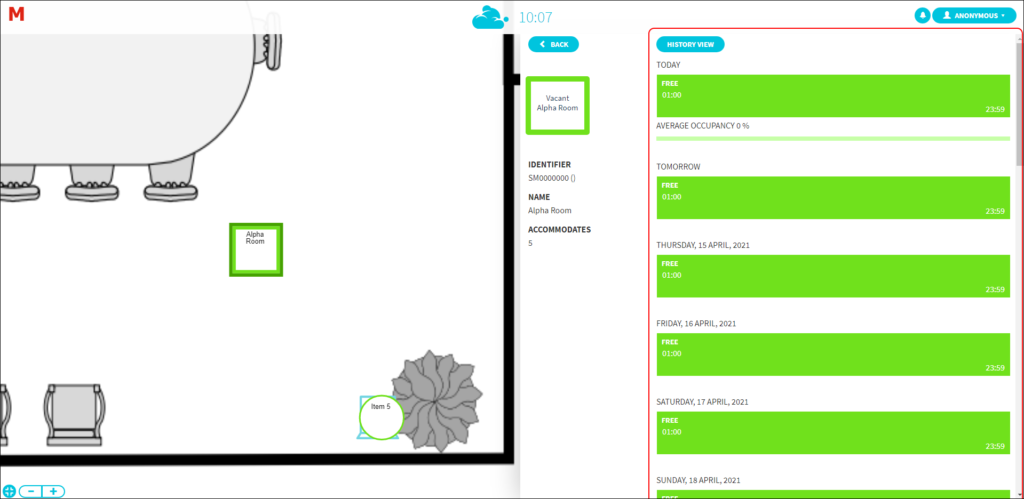
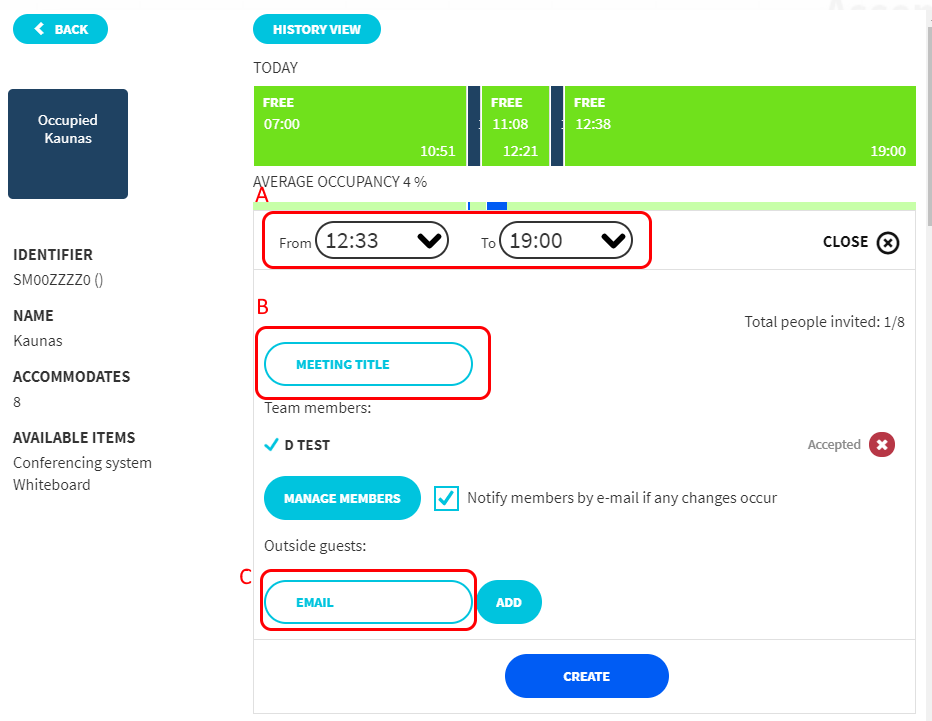
Click on the desired day on the timeline and select the exact hours you want your meeting to start and end.
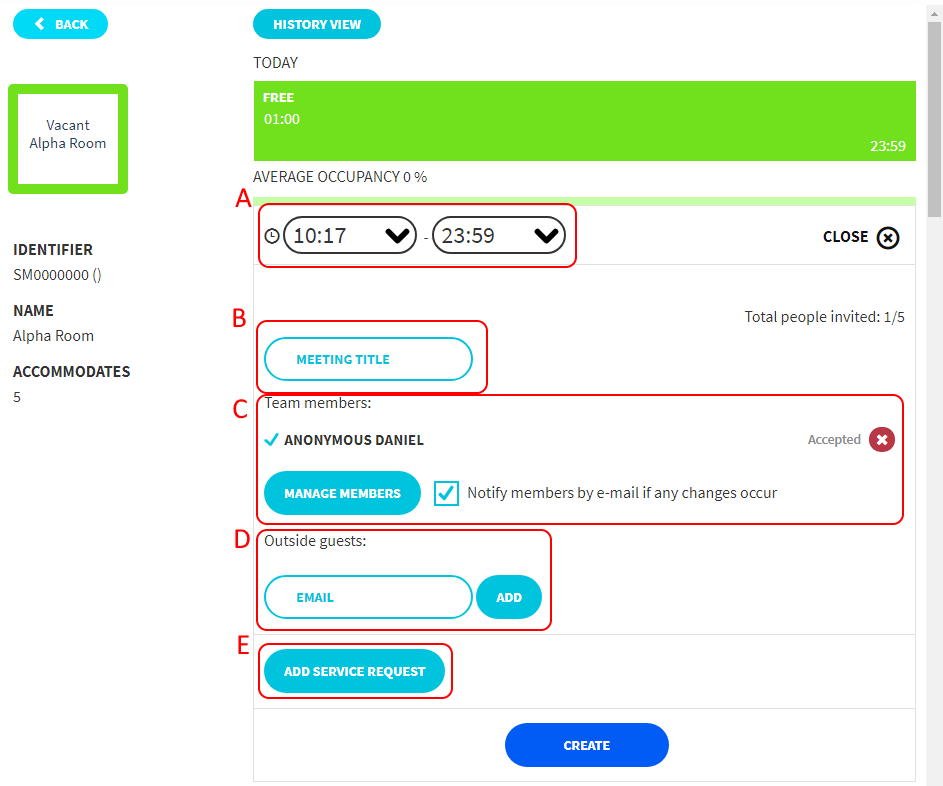
- A – booking duration
- B – meeting title
- C – team member invitations. If you click on Manage Members you will be able to invite users to your meeting
- D – email field. To add outside guests to the meeting, just write their email here and press Add. More information can be found here
- E – Add service request. This button is used to send service requests to a designated email
Service request
Service requests are additional requests when creating a meeting. Ask for some water or additional chairs! Simply click on the Add Service Request button and a pop-up will appear with a text area:
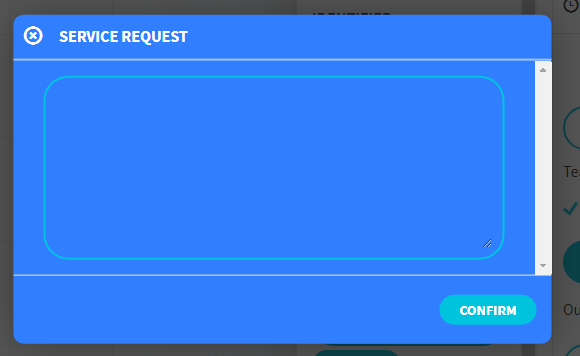
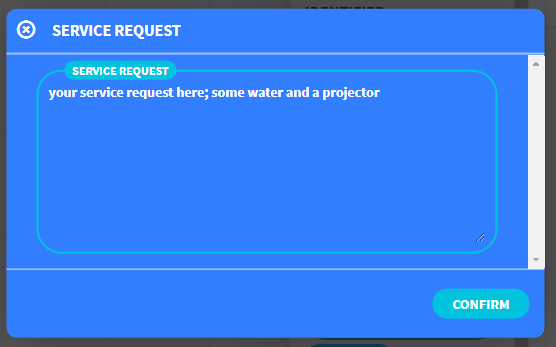
Once you are happy just click confirm. The request will be sent to the person responsible for this feature. For administrators, more information can be found here.
Creating a parking space booking
If your office has parking spaces, you can book them to let your colleagues know that you are currently using that parking spot or car resource.
Booking these resources is the same as booking a desk – click on the parking resource you want to use and a timeline will open
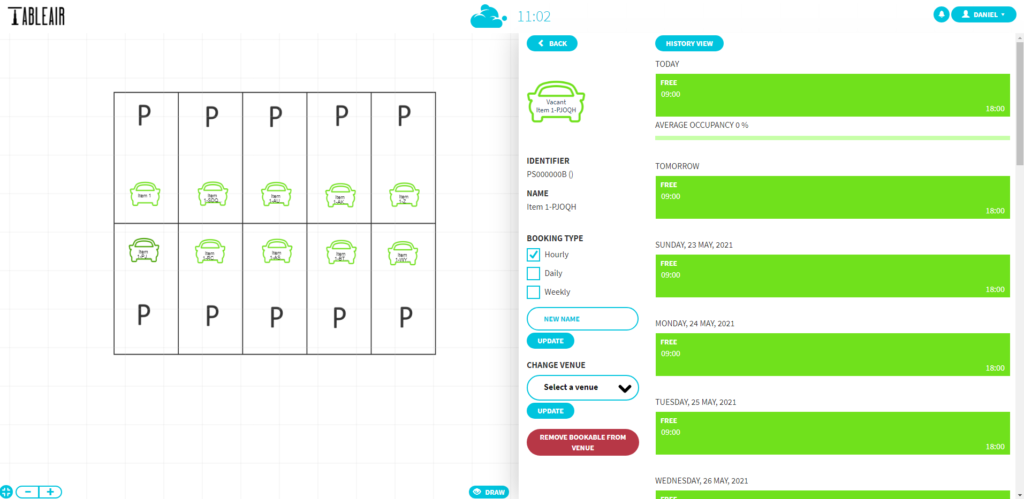
Then, select the day and the start and end hours.
Finally, click Create.
Alongside different resource icons, parking spaces can be booked even if you already have a desk booked. Thus, you can have a desk and a parking space booked for the entire day at the same time.
Reviewing your bookings
Click on the account icon 
On the dashboard, you will see all your bookings and will be able to do edits or cancellations, all in one place. Simply click the Edit button at the end of the booking line.
Note: you cannot edit the time of the booking that has already started. You can only remove this booking.
Click Go to the venue to go back to the floorplan.
Name change
Every user in the system has the option to change the name that is displayed for everyone else in the system (i. e. when viewing bookings of workspaces or when using the Colleagues section). This displayed name change is done at the bottom of the Dashboard page. Once you scroll down, you should see a couple of options, one of which is Name:
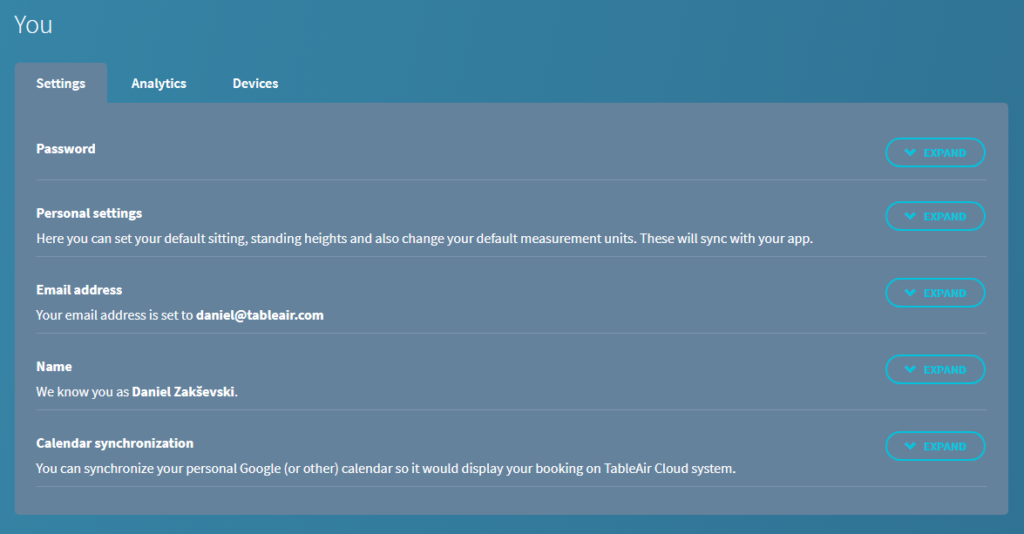
If you expand this section, you will see a form with two fields: first name and last name. If you fill those in and click update, your displayed name is going to change:


And you will see this change everywhere. For example, this is the Colleagues section after the change:
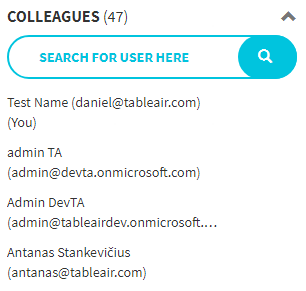
One additional option that users have is to be hidden from the colleagues’ section. This is done by changing your first name to Anonymous
Once done, you will not be visible or findable in the colleagues’ section. Of course, administrators will still be able to find you and users will be able to see if you have any bookings in the timeline of a workspace (but you will be shown as anonymous, so other users will not be able to know it is you).
Using the TableAir App
Logging in
Once an app is launched on an Android or an iPhone device, please enter your login details, and select your team and venue. If you forgot your password click forget password. In the settings, please select your team.
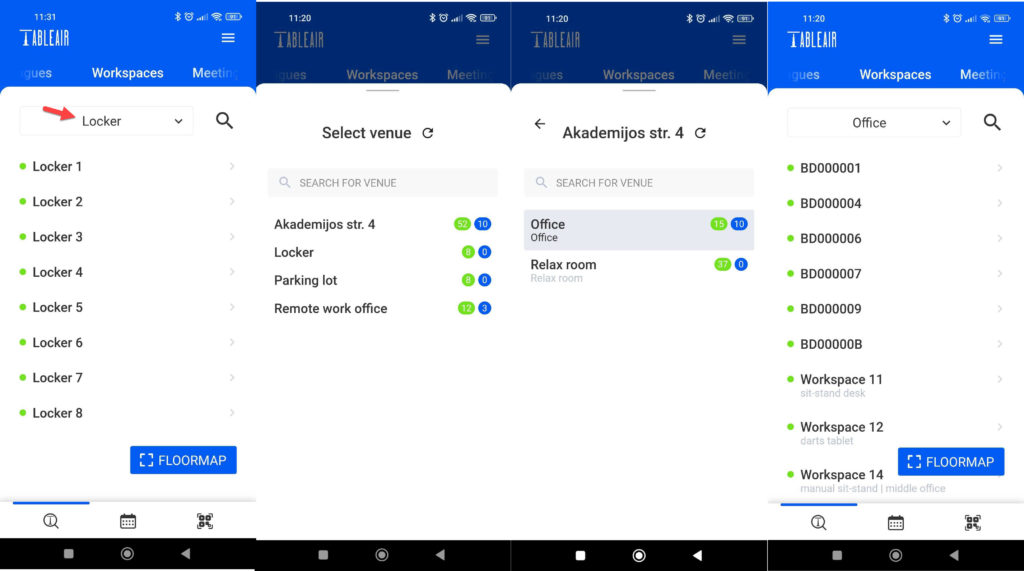
You will see an overview of all workspaces available in the venue. To change the venue click the venue selector button (red arrow).
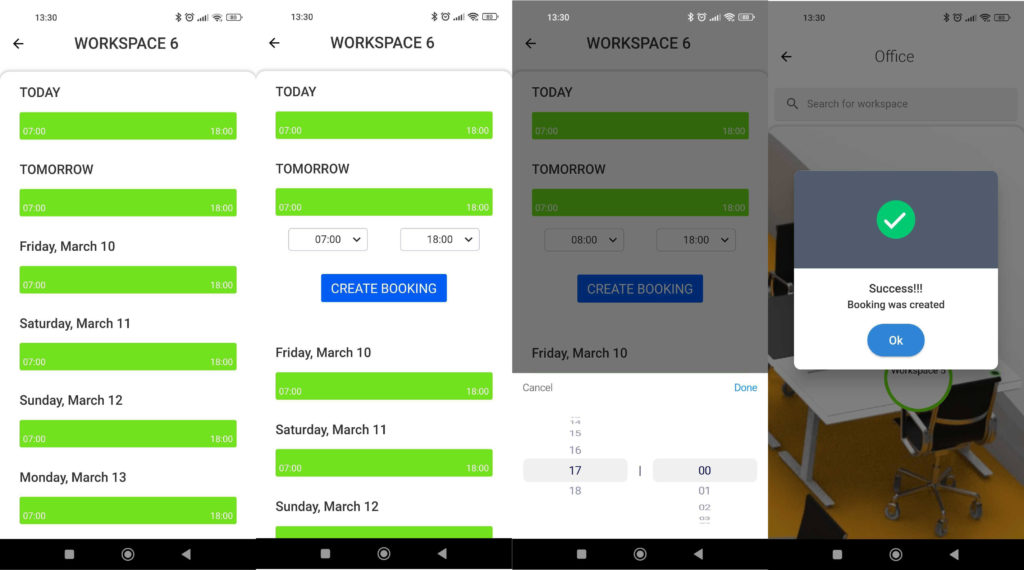
Making a booking on the app
Find a free workspace in the workspace list or click Floormap and find it in the floor map.
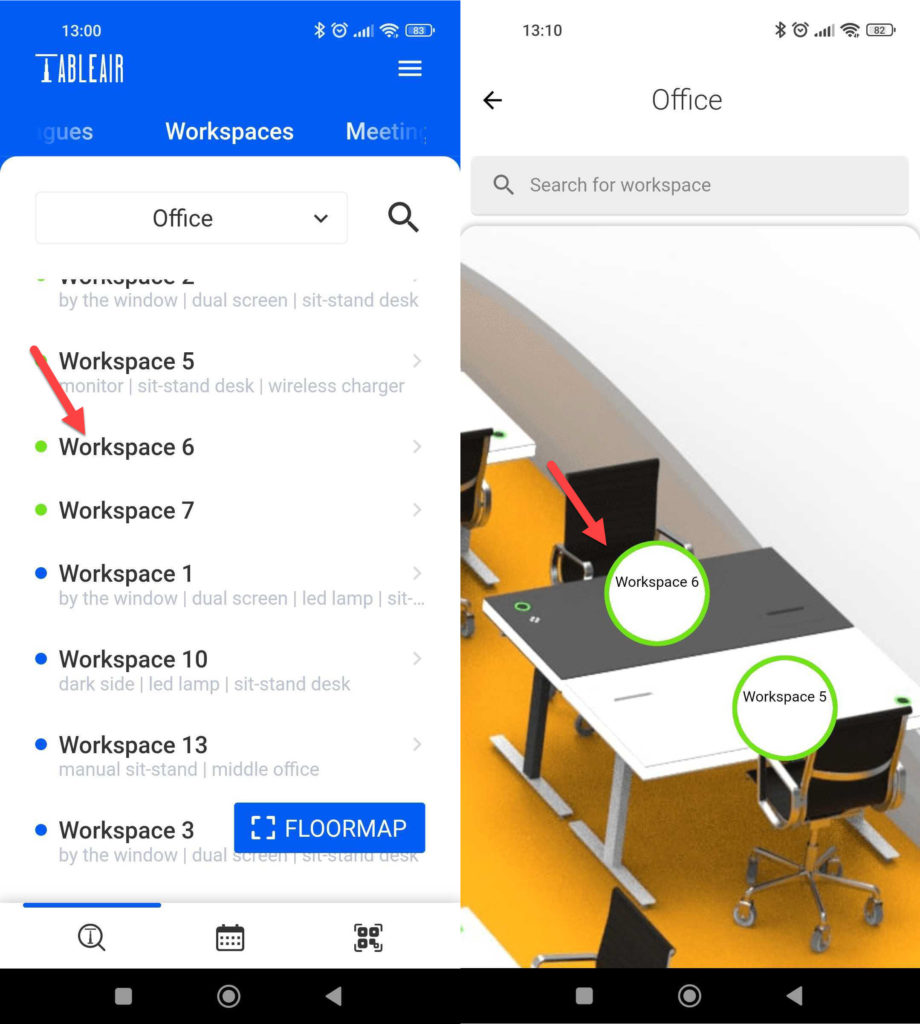
When you know which specific desk you want to book click on the timeline, select time, and click Create Booking
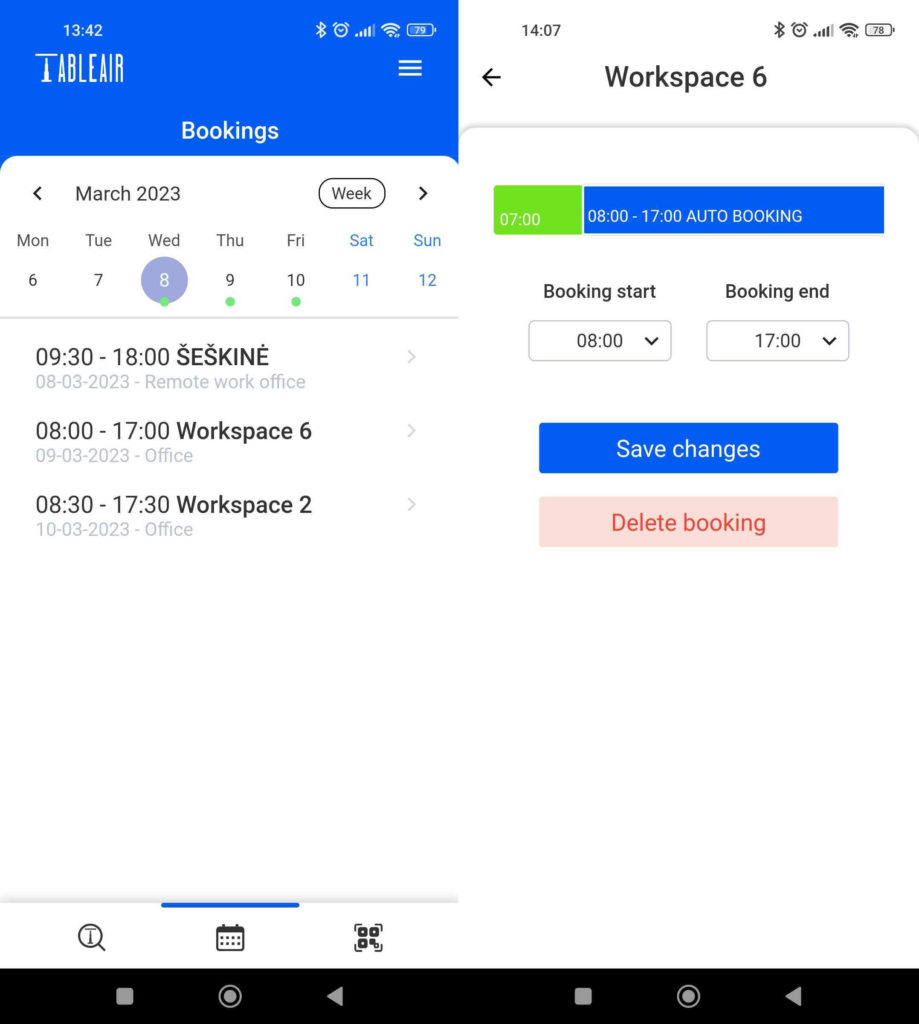
Editing bookings on the app
Click on the calendar button at the bottom corner, a menu will appear. Here you can view and change your bookings. After clicking on the booking you want to change a menu will appear. Do the needed changes or cancel the booking by clicking the Delete booking button.
QR code check-in and release
When the time of your booking starts you will receive a push notification on your device.
You will have a 30 min window to do a check-in. A check-in is a procedure that ensures that the right person is working at the right time. If you’re late or your plans changed the booking will be automatically canceled and anyone else will be able to occupy the desk.
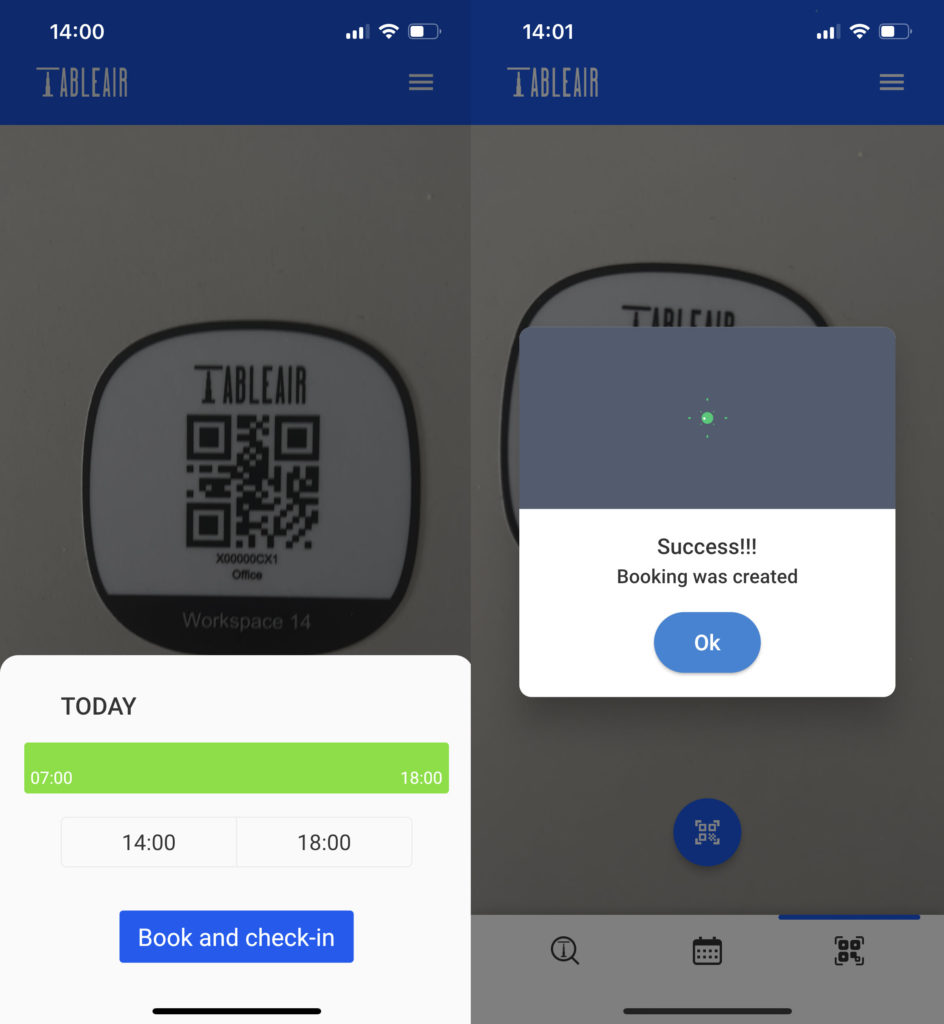
To make check-in you have to find a QR code on your tabletop. Click the QR code icon in the app and scan your workspace code, then the check-in screen appears press the Check-in button.
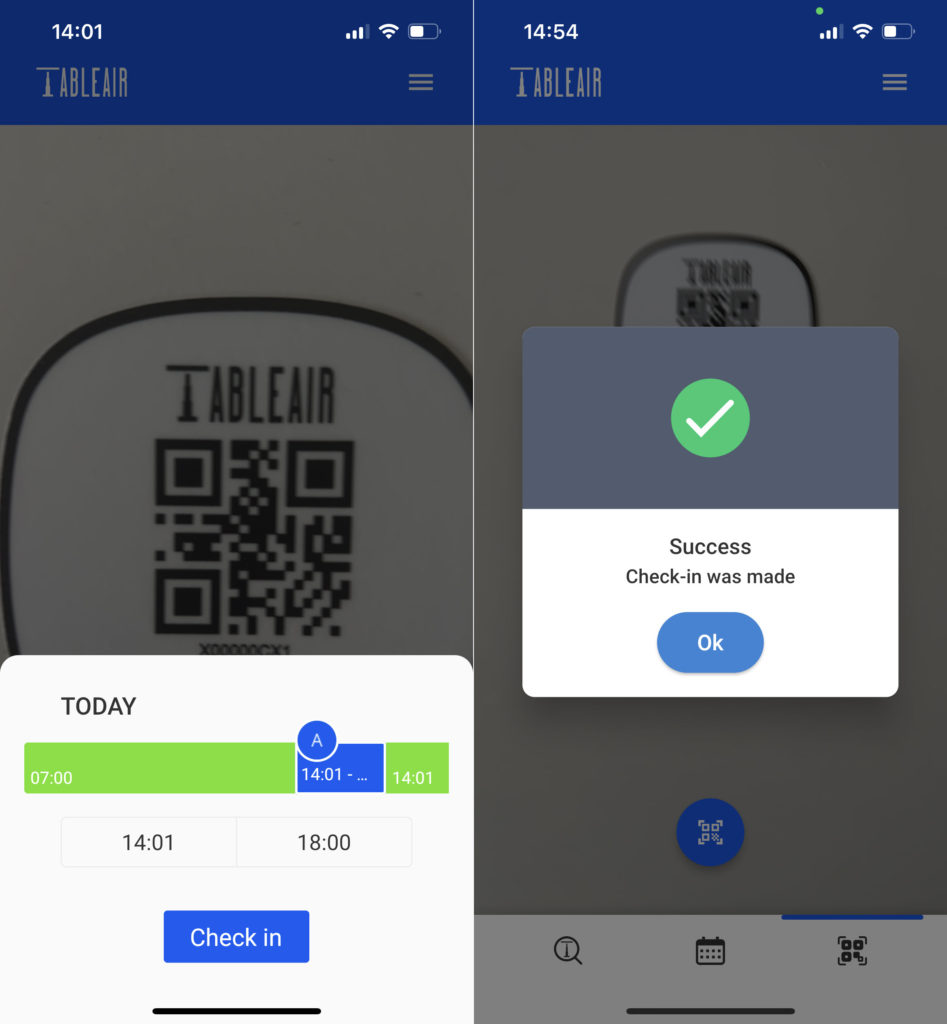
To release your booking, scan the QR code again and press Release booking button.
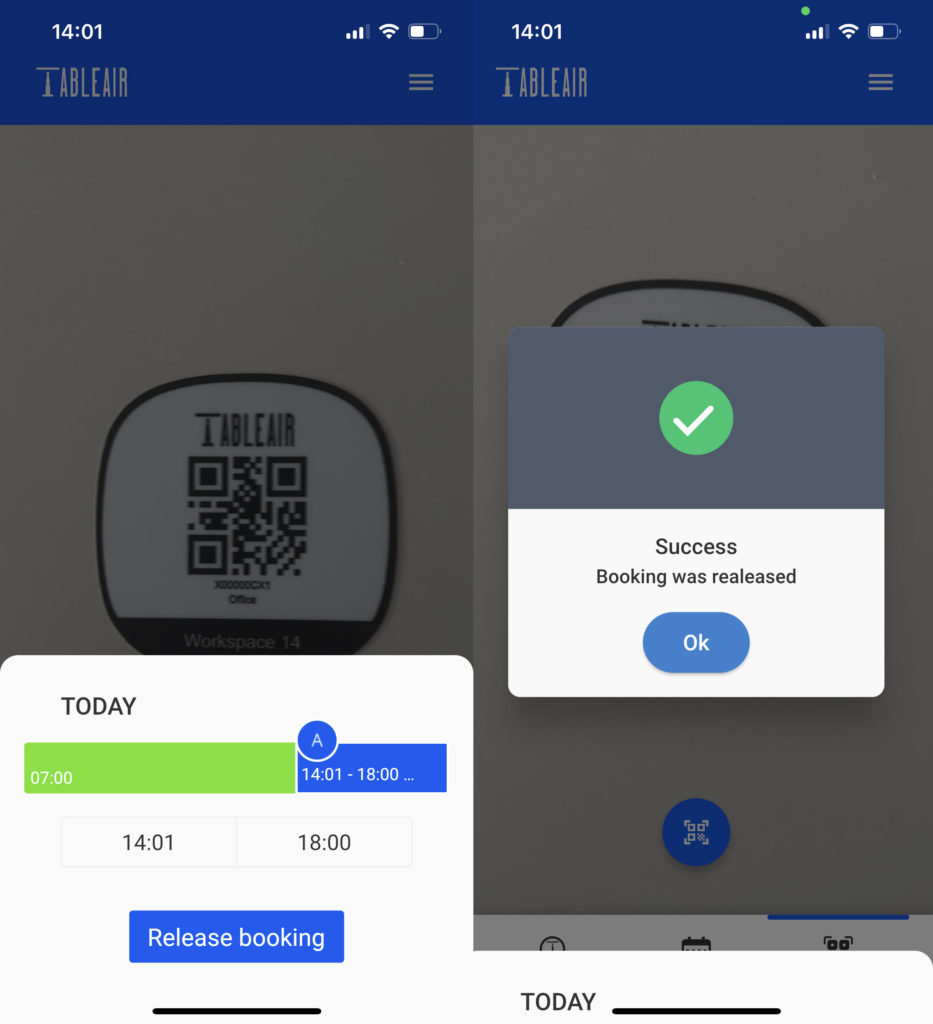
QR code book and check-in
If you found a free workspace on the spot you can make a booking and check-in you can do in one step. Scan the workspace QR code, adjust booking hours, and press the Book and check-in button.
Using TableAir Meeting rooms and Guest screens
The following covers instructions on how to use the already set up meeting room and guest screen modules. For the setup of the environment please refer to an administrator guide.
Meeting room
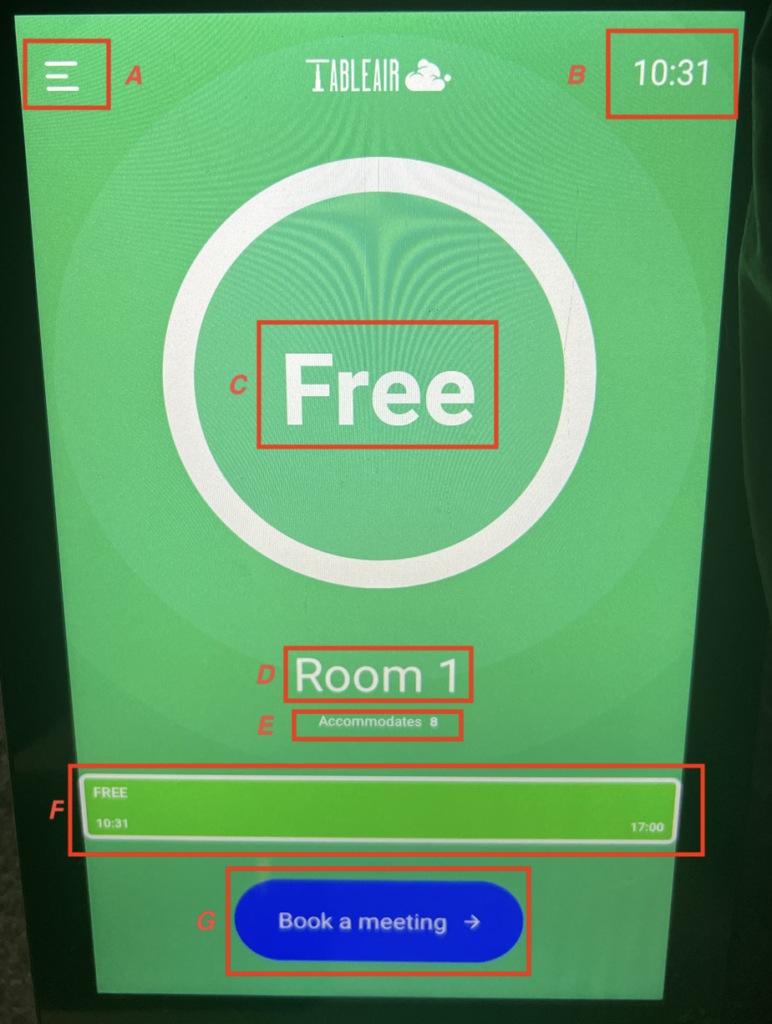
The main screen of the meeting room app shows the status of the meeting room, the available items, and the time.
- A – additional settings
- B – meeting room time
- C – the status of the meeting room
- D – the name of the meeting room
- E – available items in the meeting room
- F – the timeline of reservations for the meeting room
- G – Book a meeting button
After pressing the Book a meeting button, you will be taken to the following screen:
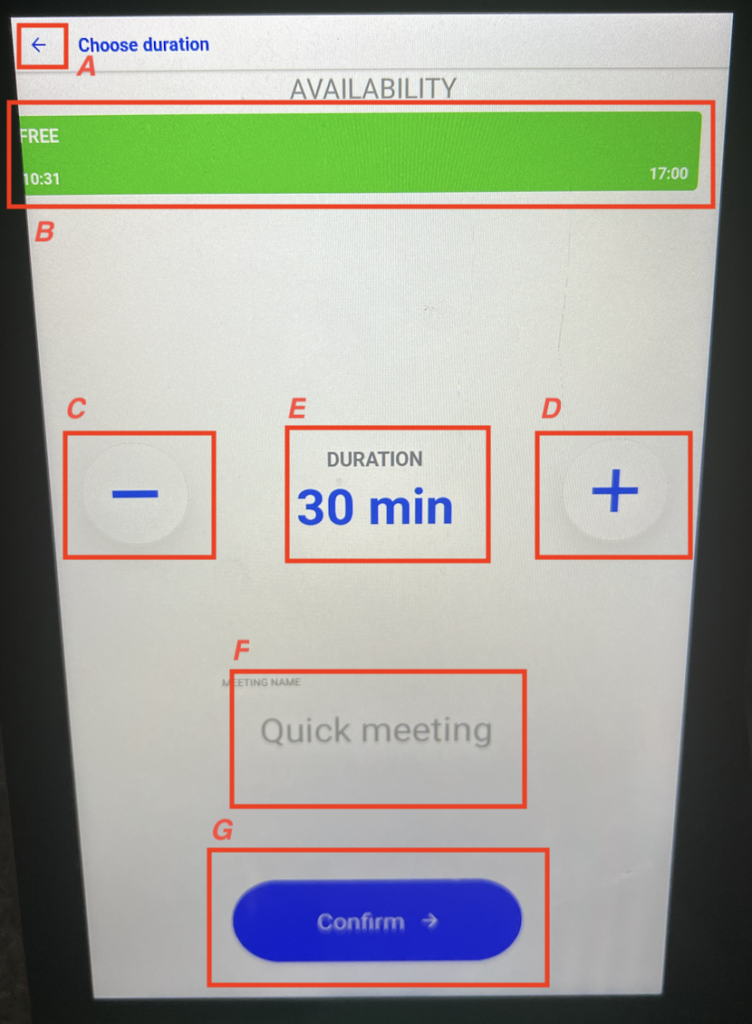
- A – back button
- B – the reservation timeline
- C – decrease the duration of the booking
- D – increase the duration of the booking
- F – the name of the meeting. You can change it by pressing on it
- G – confirm button
After taping “Confirm” a booking will be created, you will be able to see it on the timeline on the starting screen:
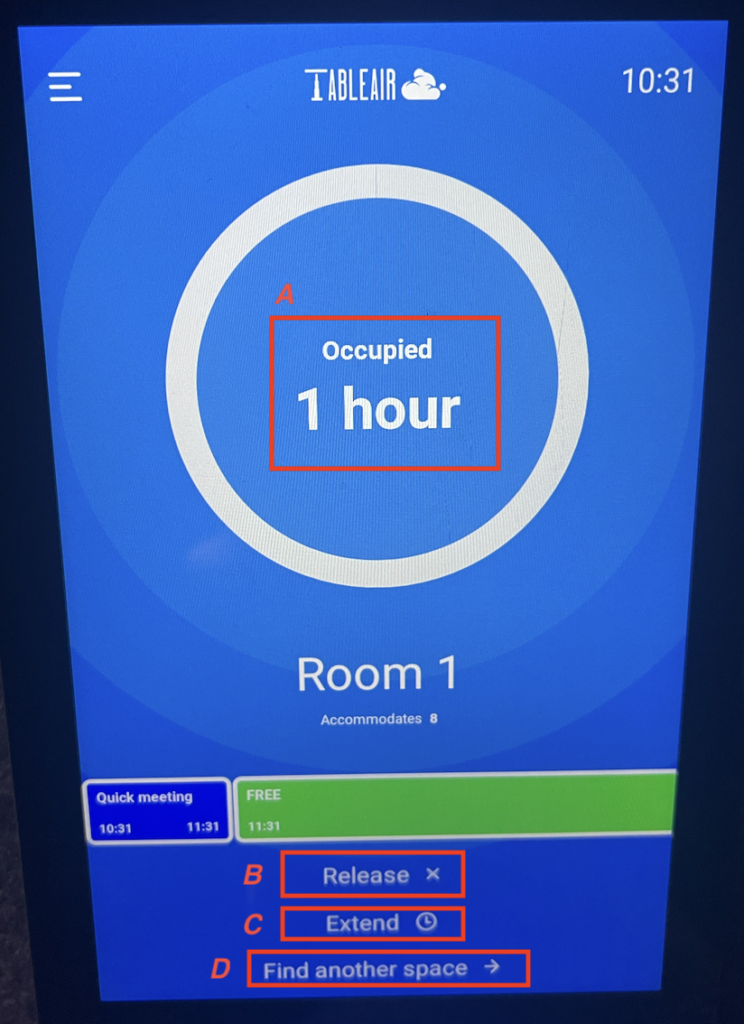
- A – the duration of the current booking
- B – Release button. Press it to cancel the current booking
- C – Extend button. Press it to extend the duration of the current booking
- D – Find another space → button. Press it to see other meeting rooms in your team
After pressing the Extend button you will be taken to the following screen:

- A – decrease the duration
- B – increase the duration
- C – the amount of time the meeting will be extended by
- D – Confirm button
By pressing the sandwich menu button, you will be shown the following options:

- A – the name of your team and the venue
- B – see all upcoming bookings of the meeting room
- C – Switch the venue button. Only for administrators
- D – Logout button. Only for administrators
- E – Report issue button. Here you can report bugs or suggestions
- F – See other meeting rooms
Guest Screen (with invitation)
When creating a booking for a meeting room, you may add guests which are not part of your team. When they arrive, they will need to enter the PIN sent to them by email.
- A – booking duration
- B – meeting title
- C – email field. To add outside guests to the meeting, just write their email here and press Add.
After creating the meeting, outside guests will receive an email with a unique 4-digit PIN number.
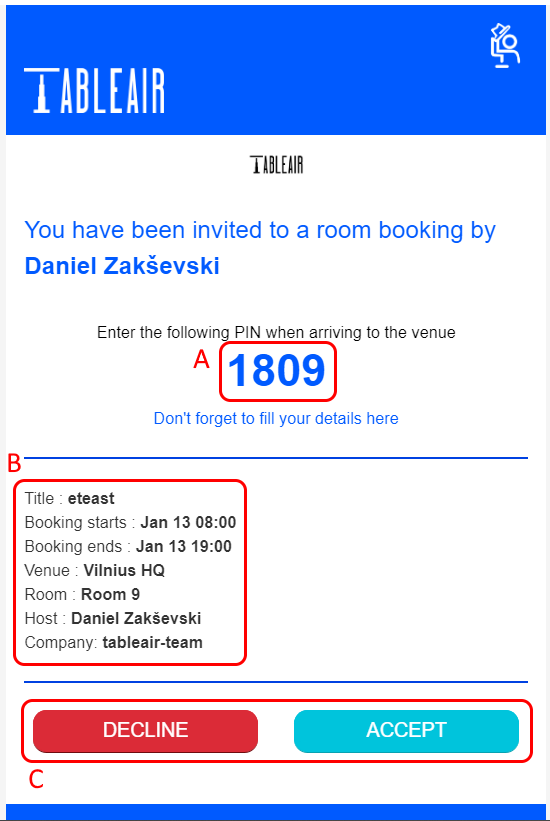
- A – the PIN number the guest must use when arriving to the venue
- B – the meeting information
- C – the guest accepts or declines the invitation. Either way, you will be informed of their decision

Having arrived, your guest should simply press CHECK IN and enter his PIN.

Having entered the PIN, press CHECK IN again. Soon after the host of the meeting will be informed about the arrival of the guest by instant email message.

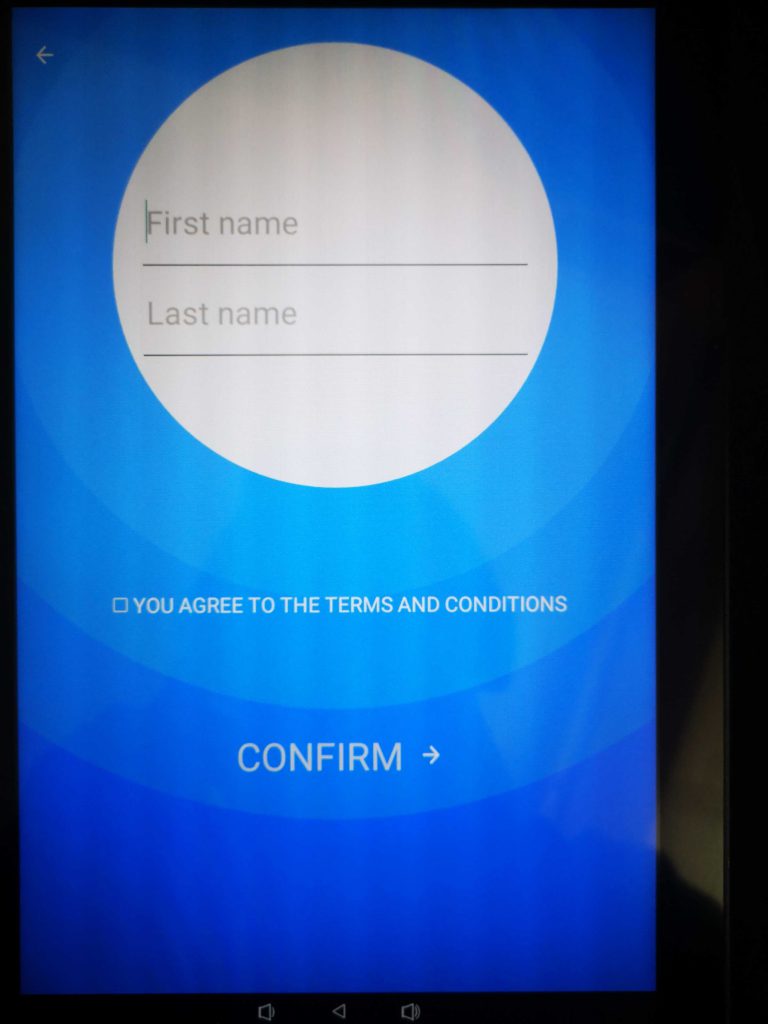
If your guest did not accept the invitation before (in the email) then they will need to enter their details in the tablet.
Guest Screen (without invitation)
When using our guest management system, the invitation of external users is not a requirement. External users can register using the tablet and administrators will be able to see the entry live.
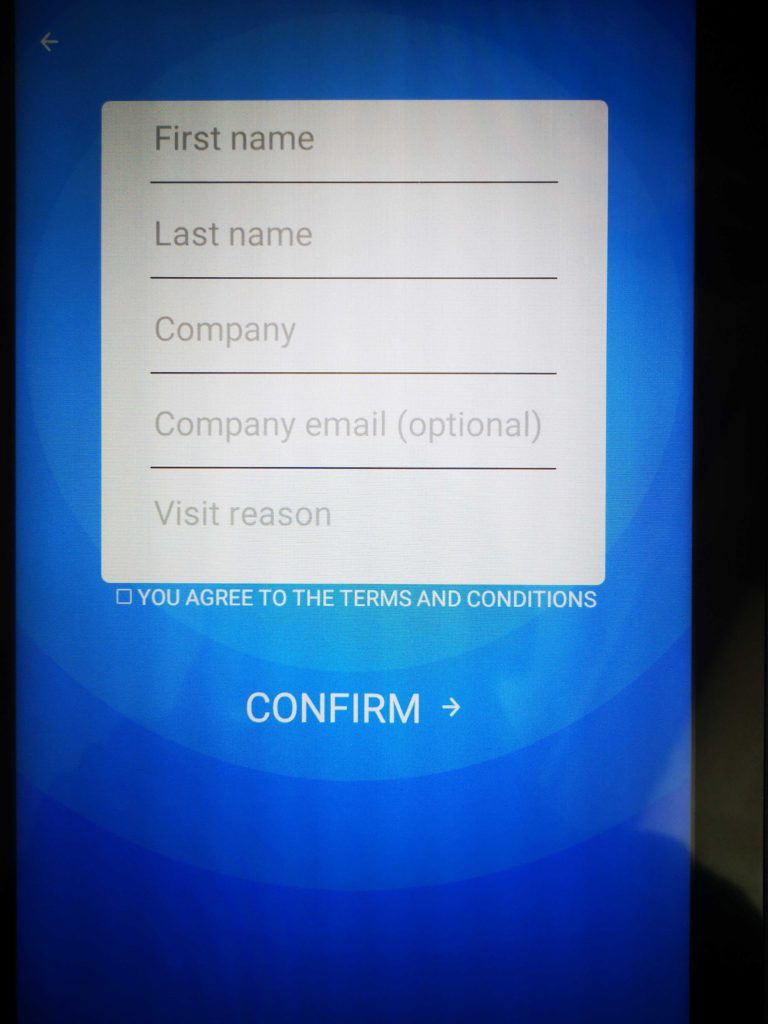
If an external user has not been invited, after pressing CHECK IN there is an option called ‘NO PIN CODE’ which is used exactly for this purpose. After clicking it you need to enter their details in a form:
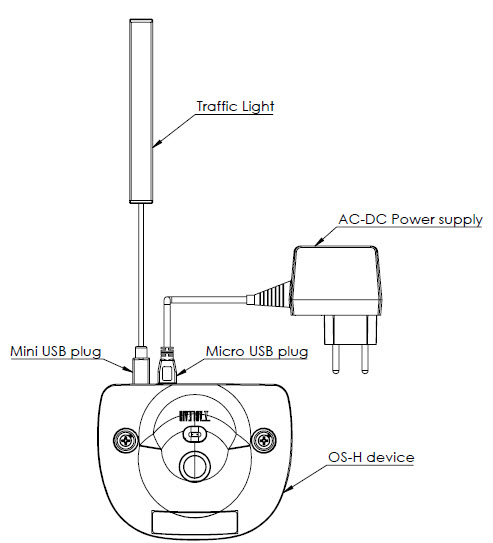
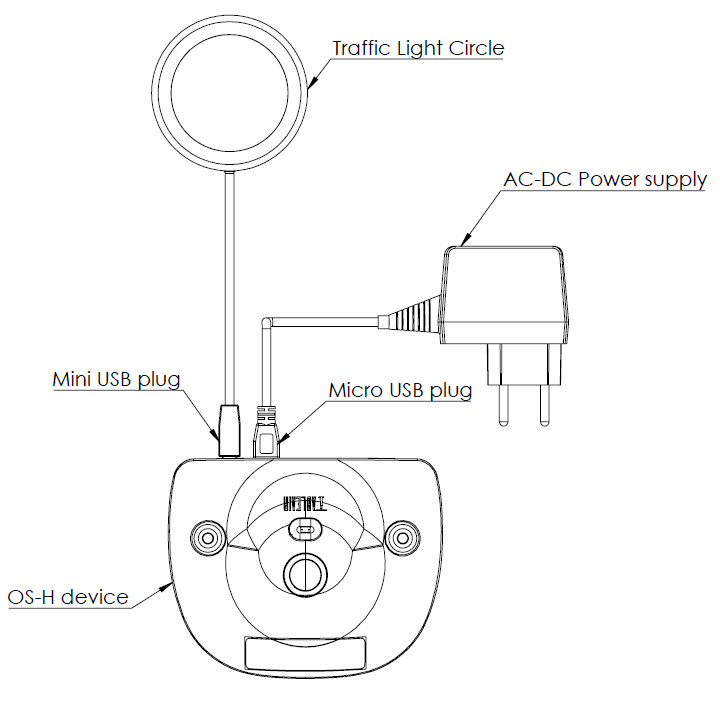
Sensors and Traffic Lights
Every desk is equipped with a Sensor (it detects desk occupancy) and a Traffic light – an LED indicator displaying workspace availability, the statuses, and their meanings are shown below
Overall scheme
Traffic Light status meaning (with SBUplus firmware v.725)
| Occupancy status | Booking status | Color and meaning of the LEDS |
| A desk is not occupied. | A desk is not booked. |  |
| Occupancy detected. | A desk is not booked, but a person presence is detected. Waiting at least 60 sec to book the desk. |  |
| A desk is occupied. | A desk is booked and a person’s presence is detected. |  |
| A desk is not occupied. | A desk is booked, but the person’s presence is not detected. |  |
| No network connectivity (pulsating yellow LED) | ||
| Smartphone connected to the sensor via Bluetooth (pulsating blue LED) | ||
| Requires sanitation | The desk has been used and was not cleaned and disinfected yet. |
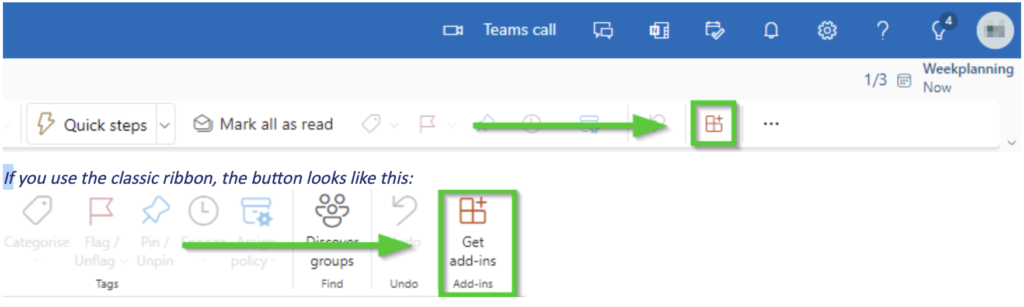
Installation of Outlook Web Add-in
- Select Get Add-ins
- If you use the classic ribbon, the button looks like this:
- If this button doesn’t work you can directly try this url: https://outlook.office365.com/owa/?path=/options/manageapps)
- Choose My add-ins in the menu on the left
- Navigate to Custom Add-ins at the bottom
- If you have already installed TableAir plugin, remove it.
- Select + Add a custom add-in > Add from URL
- Enter the following URL: https://addin.tableair.com/manifest.xml
- The add-in has now been installed
- If you use the Outlook desktop app, restart the Outlook desktop app
- Open the calendar and book a meeting.