
© Copyright UAB “TableAir” 2020
All rights reserved.
No part of this manual may be reproduced in any form, by print, photoprint, microfilm or any other means without written permission from the publisher.
In spite of all care taken in composing the text and illustrations, neither the editor nor the publisher can accept any liability for possible damage that might result from any fault that may be in this publication.
Information in this document is subject to change without notice and does not represent a commitment on the part of TableAir.
TableAir Kiosk User Manual Version History
| Rev. 1.0 | 5th June 2019 | First release |
| Rev. 1.1 | 28th June 2019 | Updated with Kiosk resource setup |
| Rev 1.2 | 27th September 2019 | Updated Ubuntu setup, TV screen setup |
| Rev 1.3 | 16th October 2019 | Moved kiosk resource setup to the administrator manual |
| Rev 1.4 | 7th November 2019 | Added instruction on how to run kiosk (Windows) normally as a PC |
Introduction
TableAir Kiosk is a software product designed to help users of TableAir Cloud system to use booking, colleague finding and resource viewing on the premises, functionality. The TableAir Kiosk shall be placed in the reception or similar area accessible only to users of the system. TableAir Kiosk allows to book resources and requires people identifying themselves, therefore access to the TableAir Kiosk shall be accessible only to users in compliance to employer work policies.
TableAir Kiosk runs on a touchscreen display, below you will find instructions on how to set it up on Windows, Linux (Ubuntu) and Phillips 43BDL405IT/00 display.
Creating Kiosk resource on your team’s floor map
- Click on the “Draw” icon at the bottom right corner. Select the “Create” tab and drag and drop the corresponding Kiosk icon into the desired place on the floor map.
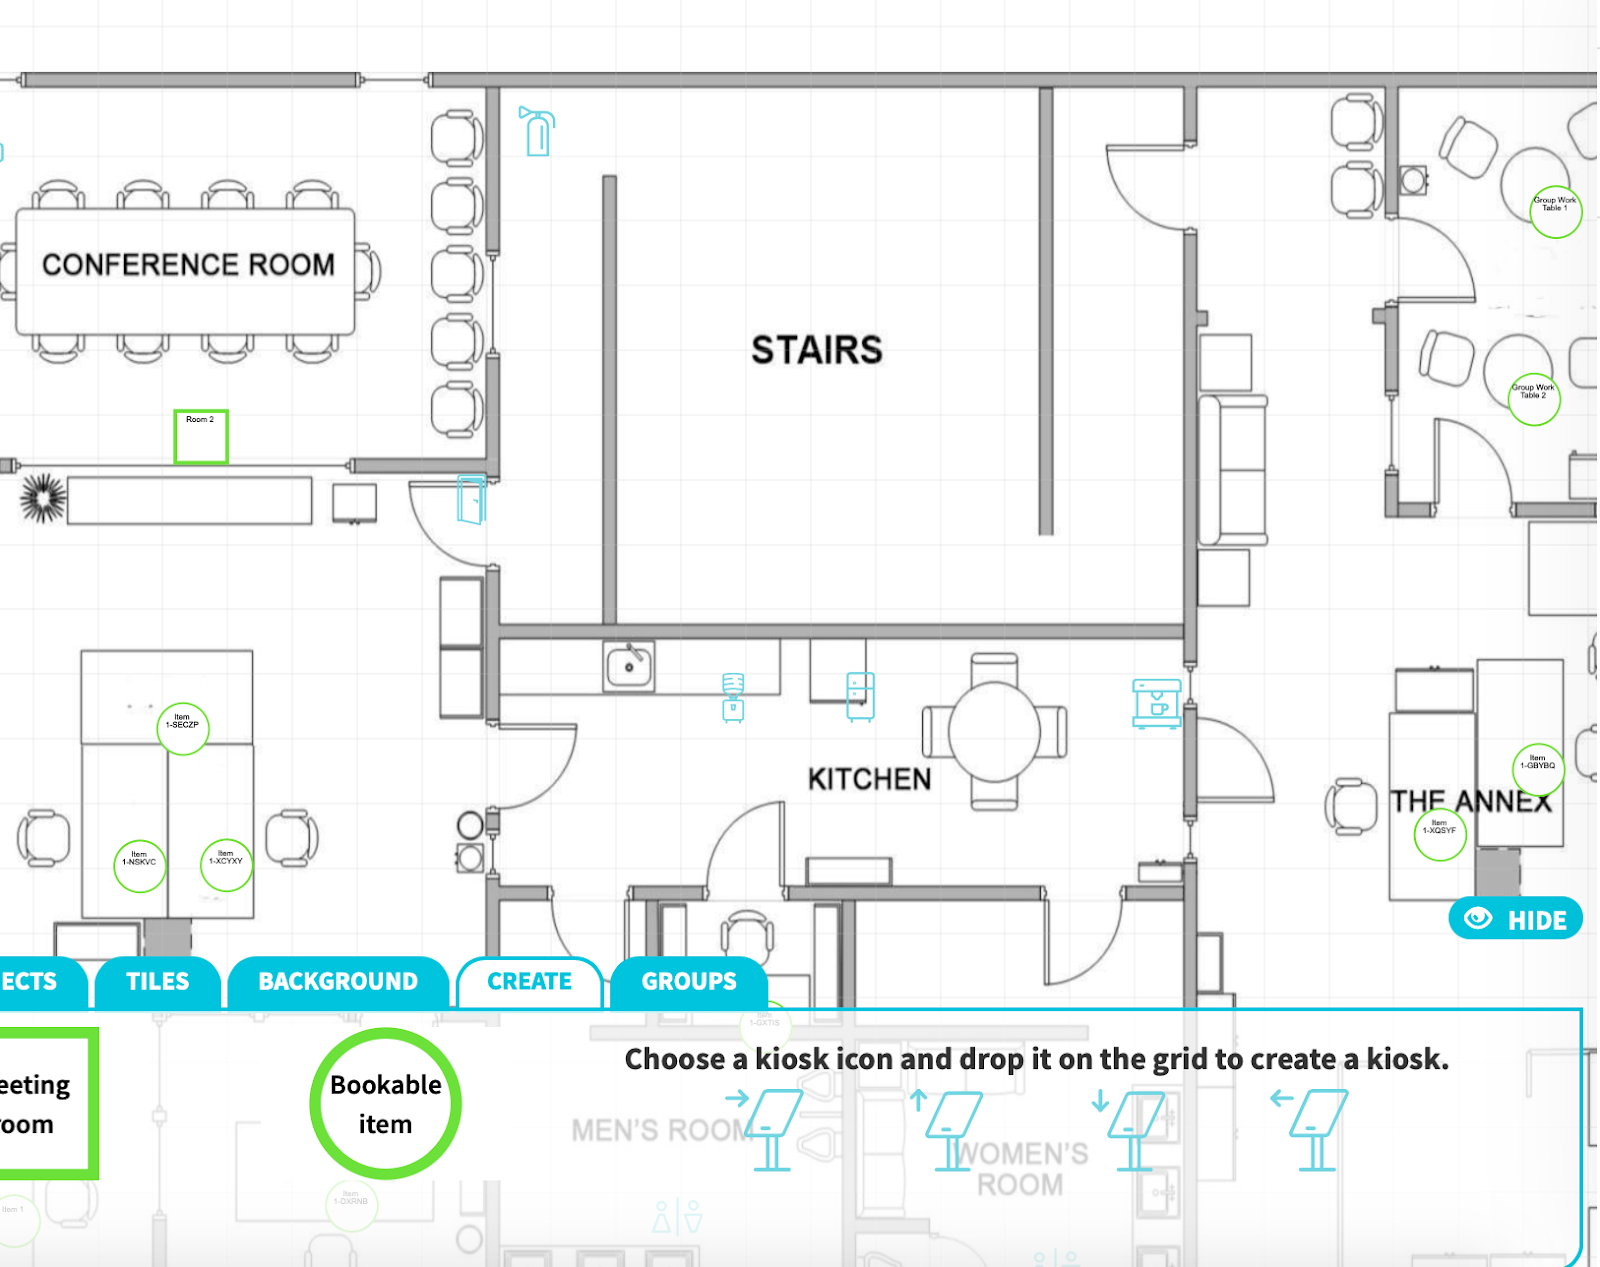
- After this action the system will identify the kiosk and it will be shown in the dashboard, under the “Kiosks” tab.
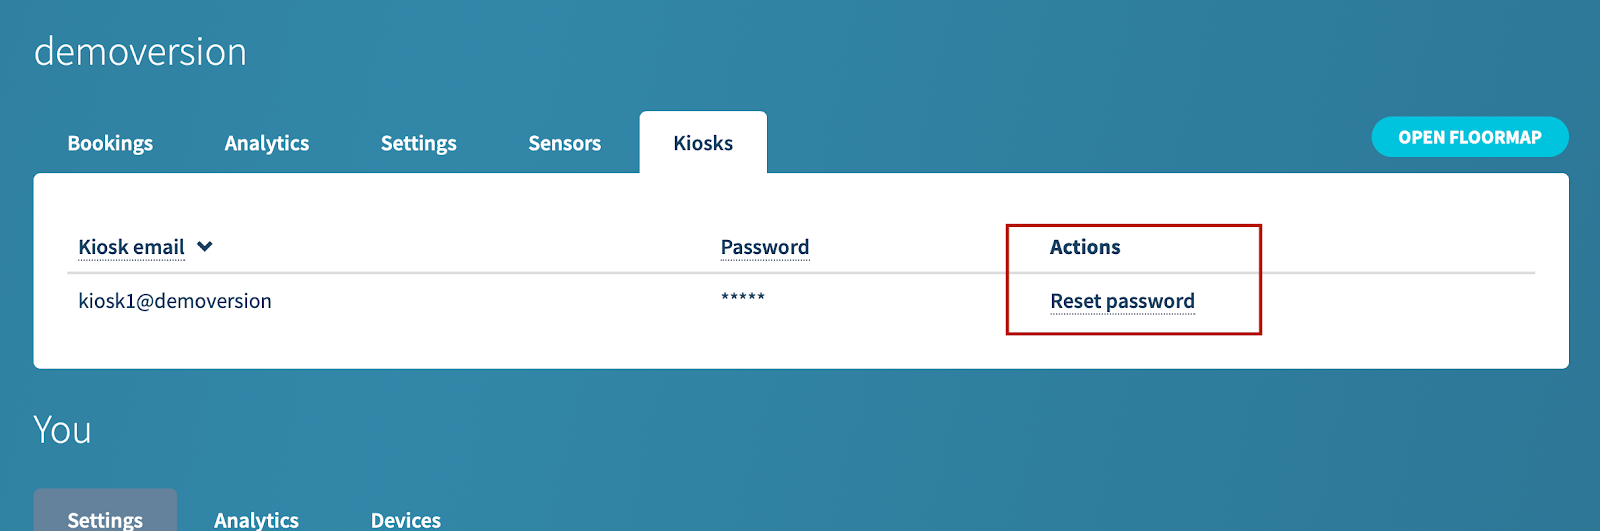
- You can now use Kiosk email and password to log in into a kiosk mode. If you forgot to write down the password when it was shown earlier, please click the Reset password to receive your Kiosk password. NOTE: the password is shown only once, so please make a copy of it immediately.
- Kiosk mode can be used on a large touchscreen device that is accessible to your company employees. It can also be used on a regular PC for administrators to book workspaces on behalf of other users.
- If you’d like to use Kiosk mode to book on behalf of your users, please go to cloud.tableair.com on your pc and login with kiosk credentials.
Using the Kiosk
Using the kiosk is essentially the same as using the browser version of TableAir Cloud.

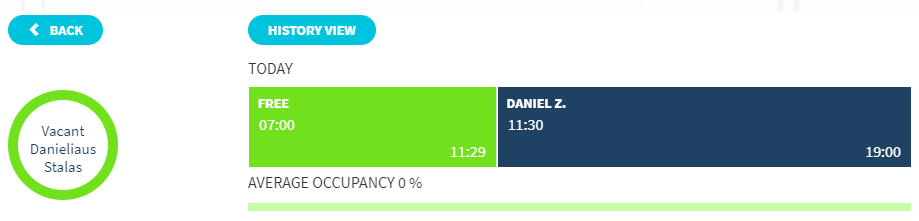
- A – colleagues module, here you will see a list of all your colleagues. If the green circle is glowing next to a colleague it means they are currently at the office. You can click on any of the colleagues’ names and the system will show you where they are sitting. Entering a name in the search bar will show you the person you are looking for.
- B – navigational buttons, zoom in or zoom out the floorplan, zoom out to view.
- C – this is a venue zone, you can switch between the venues, or use the minimap by dragging the field view.
When selecting a device to book or using the BOOK option, you will have to choose your name to book the device.

After pressing ‘Select the host’ a box will pop up where you will have to choose the host.
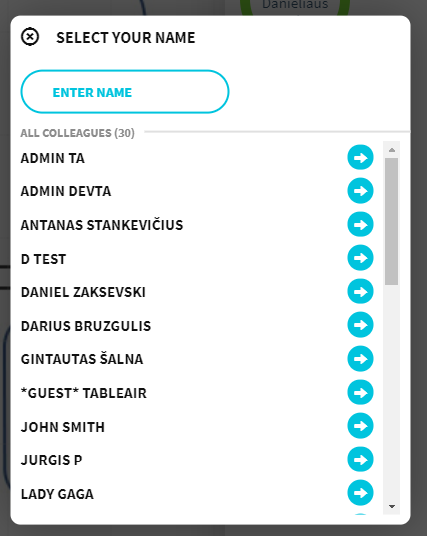
After selecting, pressing ‘Create’ will create the booking.

Wayfinding
There is an option to enable wayfinding – by pressing on an object, the users of the kiosk can see a path to this table or meeting room. To control this function, in your floor map view, press Draw.

Next, go to Path.

The switches on the right control what is shown in the venue:
Walls – if switched on, shows the drawn walls.
Pathfinding – if switched on, will show the path to the selected table or meeting room.
To draw walls, simply press the circle with a plus in it.
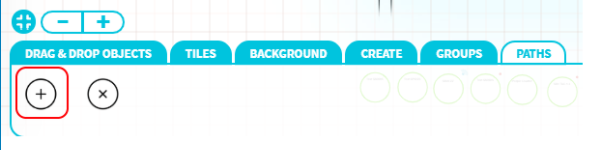
Then, simply press the squares on the grid, that should be seen as walls.

To delete these walls, select the circle with the cross on it, and select the walls on the grid that you want to delete.
By painting walls you can mark unwalkable areas (walls, tables other non movable objects). The generated path will not cross the walls.
Kiosk mode Windows
- Create regular user “Kiosk”
- Login as the kiosk user
- Install Chrome
- Display settings (ms-settings:display): change Font size to 100%
- Power Options (ms-settings:powersleep): set Sleep and Screen values to Never
- Install the Chrome plugin Touch Kiosk Keyboard – https://chrome.google.com/webstore/detail/touch-kiosk-keyboard/lfaiipcbbikbnfcgcmaldlacamgekmnb
- Set custom shell in registry (check chrome path):
Windows Registry Editor Version 5.00
[HKEY_CURRENT_USER\Software\Microsoft\Windows NT\CurrentVersion\Winlogon]
“Shell”=”\”C:\\Program Files (x86)\\Google\\Chrome\\Application\\chrome.exe\” –kiosk –disable-pinch –overscroll-history-navigation=0 http://cloud.tableair.com“
OR
You can download the reg file here:
or here:
http://cdn.tableair.com/kiosk/chromekiosk.reg
After downloading it, double-click it.
- Log off and log into the kiosk user
- Log in into the TableAir cloud system using your TableAir Kiosk credentials.
Kiosk mode Ubuntu (Gnome)
- Create a new user “Kiosk” and make automatic login ON (to do that first you need to unlock)
- Restart PC
- Update Ubuntu to the latest version (to open terminal press CTRL+ALT+T) and enter:
sudo apt-get update && sudo apt-get upgrade
- Install required packages and uninstall unnecessary packages. Type in, separately:
sudo apt-get remove gnome-screensaver
sudo apt-get install -y xscreensaver
xscreensaver-gl-extra xdotool
If you want a custom video for your screensaver, you can do that by continuing to step 5. However, if you want simple screensavers skip to step 8.
- Download your video, put it in your desktop and rename it to “video”
- Install vlc:
sudo apt-get install vlc
- Now you need to access the .xscreensaver file. To do that:
sudo pico .xscreensaver
Go to the bottom of the file, find Programs, and at the bottom of Programs add:
"Video" cvlc --loop --fullscreen --no-audio      \
--drawable-xid $XSCREENSAVER_WINDOW      \
--no-video-title-show     \
/home/kiosk/Desktop/video.mp4    \n\
To save your changes, press CTRL+O, then hit Enter
Then, press CTRL+X and in the terminal type in:
exit
- Find screensaver options, and choose your mode and screensavers. If you created a custom screensaver, then the name will be “Video”.
- Download Google Chrome from any other web browser
- Open Startup Applications via the Activities overview. Alternatively you can press Alt+F2 and run the gnome-session-properties command. Click Add and enter the commands to be executed at login:
/usr/bin/google-chrome --window-size=1920,1080 --kiosk --disable-pinch --overscroll-history-navigation=0 --window-position=0,0 https://cloud.tableair.com
and separately:
/usr/bin/xscreensaver -no-splash
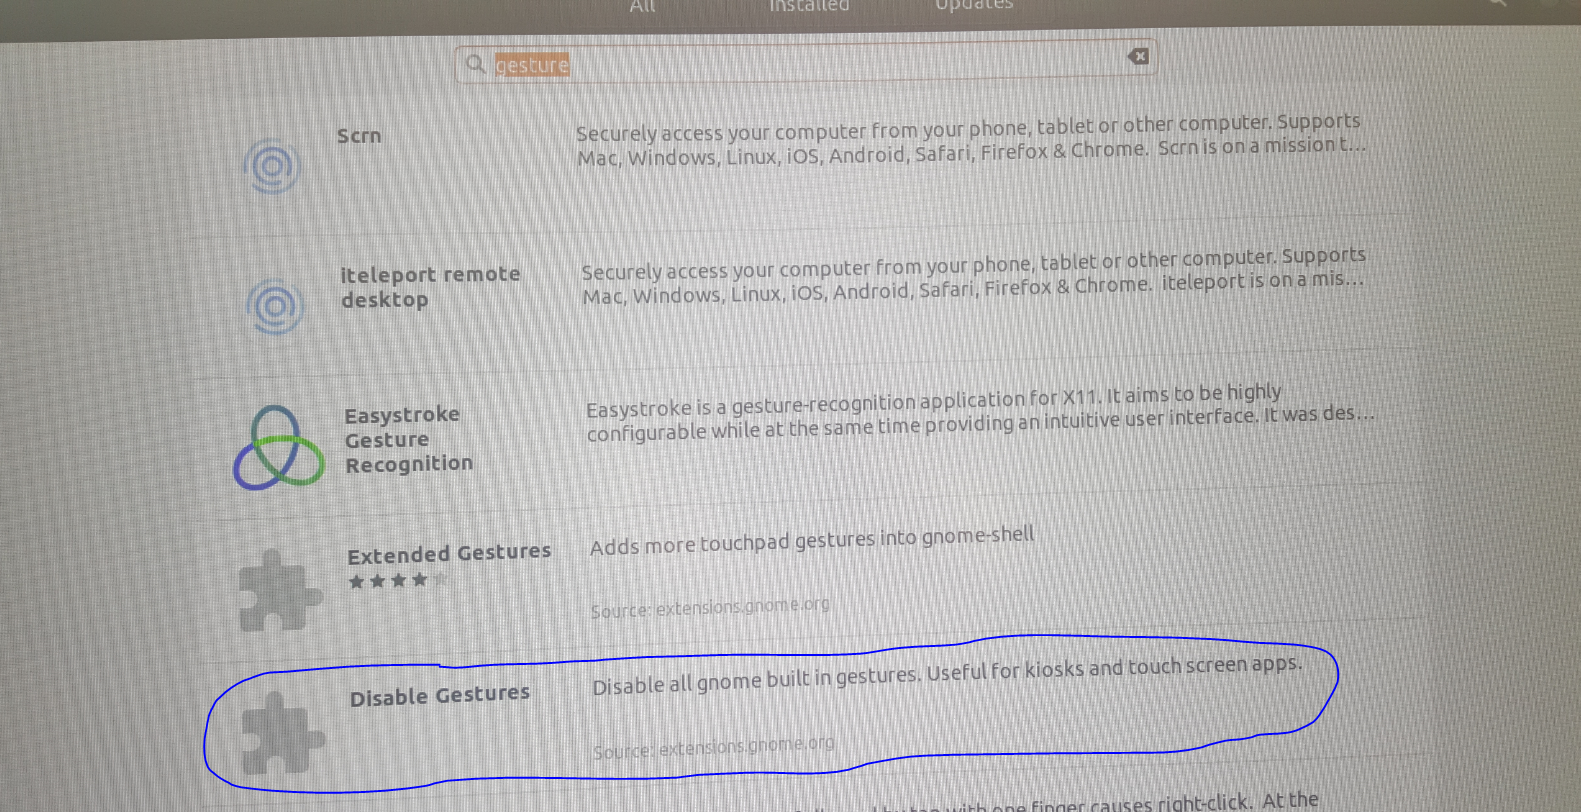
- Inside Ubuntu Software, download the app “Disable Gestures”
- Go to power settings and disable “Blank screen” option (set it to Never) and go to privacy settings and set “Automatic screen lock” off.
Phillips 43BDL405IT/00 display configuration
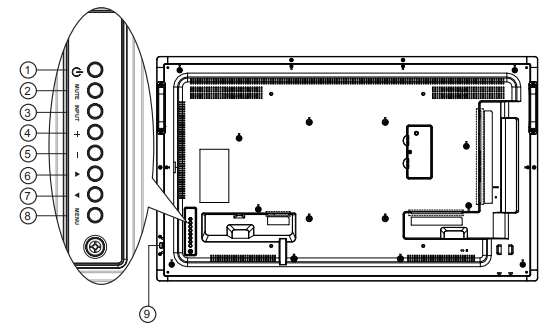
- Press Menu button (number 8 on the picture)
- Choose Advanced Option -> Schedule menu
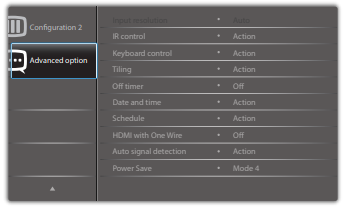
This function allows you to program up to 7 (seven) different scheduled time intervals for the display to activate. You can select:
• The time for the display to turn on and turn off
• The days in a week for the display to activate.
• Which input source the display will use for each scheduled activation period.
NOTE: We recommend you to set up current date and time in the {Date and time} menu before using this function.
- Press [OK] or [
] button to enter the submenu.

- Press
or
button to select a schedule item (item number 1 ~ 7), and then press [OK] button to mark it the item number

- Press [
] or [
] button to select the schedule:
5.1 Power-on schedule: Press or
button to set the hour and minute for the display to turn on.
5.2 Power-off schedule: Press or
button to set the hour and minute for the display to turn off. Select or leave an empty “__”for both the hour and minute slot if you do not want to use this power-on or power-off schedule.
5.3 Input-source selection: Press or
button to select an input source. If no input source is selected, the input source will remain the same as last selected.
5.4 Date schedule: Press [] button to select which day in a week this schedule item will take effect, and then press the [OK] button.
5.5 When Input-source select to USB, enable to access playlist setting:
- For additional schedule settings, press [
], then repeat the steps above. A check mark in the box next to the number of the schedule item indicates that the selected schedule is in effect.
- Connect your PC to the screen (HDMI, VGA, etc.) and for the touchscreen to work connect USB-A from the PC side to USB-B to the TV.
NOTES:
• If the schedules overlap, the scheduled power-on time takes priority over scheduled power-off time.
• If there are two schedule items programmed for the same time, the highest numbered schedule takes priority. For example, if schedule items #1 and #2 both set the display to power on at 7:00 AM and off at 5:00 PM, then only schedule item # 2 will take effect
Make kiosk (windows) run normally
If, for some reason, you need your kiosk to run normally like a computer, these are the steps to do that. After you have done everything just restart the computer and your kiosk will run like it is supposed to.
- Connect a keyboard and, if available, a mouse to your computer
You can do everything with a keyboard but that is tricky to do, so a mouse will make the process a lot easier,
- Press the CTRL+SHIFT+ESC combination on your keyboard
This is what you should see open:

If this is not what you are seeing, press the button located at the bottom left corner of Task Manager.
- At the top of Task Manager click File –> Run new task
This will open a window:

- Type in explorer and press OK
After you wait for some time, you should see the taskbar show up and be able to browse your computer normally.
After doing what you wanted to, just restart the computer and your Kiosk will boot up.