© Copyright UAB “TableAir” 2023
All rights reserved.
No part of this manual may be reproduced in any form, by print, photoprint, microfilm or any other means without written permission from the publisher.
In spite of all care taken in composing the text and illustrations, neither the editor nor the publisher can accept any liability for possible damage that might result from any fault that may be in this publication.
Information in this document is subject to change without notice and does not represent a commitment on the part of TableAir.
OS-M User Manual Version History
| Rev. 1.0 | 8th May 2023 | First release |
| Rev. 1.1 | 11th Aug 2023 | Added Installation requirements |
Hardware Version History
| Rev. B | October 2019 | First production release |
Warnings and Statements
Introduction
The exclamation mark within an equilateral triangle is intended to alert the user to the presence of important operating and maintenance (service) instructions in the literature accompanying the apparatus.
Read this manual before attempting to start up or service the product. Retain the manual for future use. TableAir accepts no responsibility for any consequential loss, failure or damage resulting from a failure to heed any warnings or to follow the instructions.
Warnings
The OS-M may be operated only from the power adapter provided by TableAir. Operation from other supplies is not authorized.
The cables should not exceed 3 m in length.
Warranty and support services
Technical support
Should you need technical assistance please contact “TableAir” UAB.
Email: support@tableair.com Web: www.tableair.com
Return Merchandise Authorization
Please contact via numbers above to receive an RMA number before sending your product back to us for repair. Products sent without an RMA number will be returned to sender.
One-year limited warranty
- This device is guaranteed against manufacturing defects for one full year from the original date of purchase.
- This warranty is valid at the time of purchase and is non-transferable.
- Damage caused by accident, misuse, improper storage, and/or uncertified repairs are not covered by this warranty.
- Warranty is only valid in the country of purchase.
- We assume no liability that may result directly or indirectly from the use or misuse of these products.
Technical specification
OS-M technical specifications:
| Specification | Value | |
|---|---|---|
| Environmental | Usage temperature | +15°C to +30°C |
| Storage temperature | 0°C to +40°C | |
| Relative humidity | 5% to 95% (non-condensing) | |
| Dimensions | Length | 127.0mm |
| Width | 102.0mm | |
| Heigth | 24.0mm | |
| RF Operation | Bluetooth | 4.0 LE |
| Wi-Fi | 2.4GHz b/g/n | |
| Antenna | Internal | |
| Power Requirements | Supply Votlage | 5V |
| Operating Current | 0.5A | |
| External Connectors | Power | Micro USB |
| Sensors | Occupancy | PIR |
| Detection distance | 12m | |
| Indicators | LEDs | Green LED |
| Accessories | AC/DC power supply | 5V, 5W |
| USB A to micro USB power cable | 3m | |
| Adhesive cable clip | 4pcs | |
| Protection classes | Water Proof | IPX1 |
Software architecture
OS-M (later referred as the sensor) can be and in standard application is a part of TableAir Cloud system. The architecture of the system is presented below with the sensor corresponding placement in Meeting room sensors:
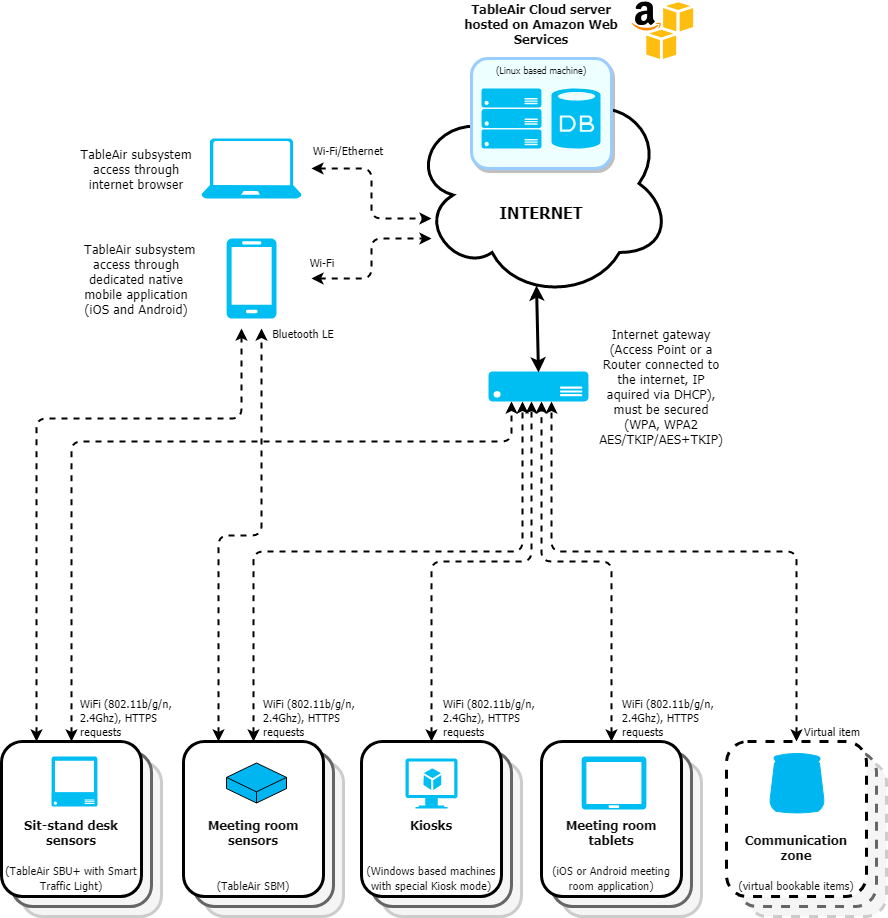
It is also possible to use the sensor in a different architecture environment.
Introduction
The Sensor is designed to detect the occupancy of a meeting room within an office environment and book it.
Occupancy and booking data is transmitted wirelessly to a central database where it can be used to make informed decisions regarding the workspace utilization and efficiency.
The Sensor can be located up to 30 m away from an Access Point. With objects in the way a more typical range is 15 m. WiFi requirements depend on the number of sensors installed. 10-20 units can be used with a basic router, 20-100 sensors require an enterprise grade router.
This manual details the Sensor installation procedure.
Installation
| What’s in the box? | 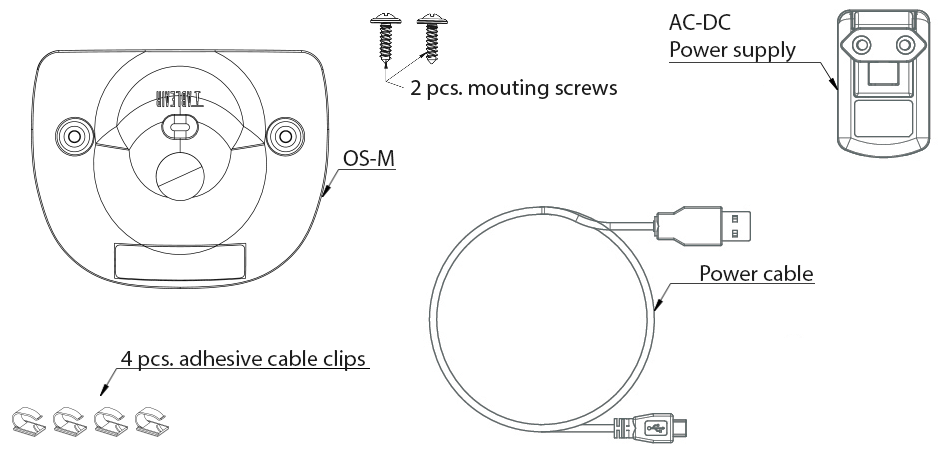 |
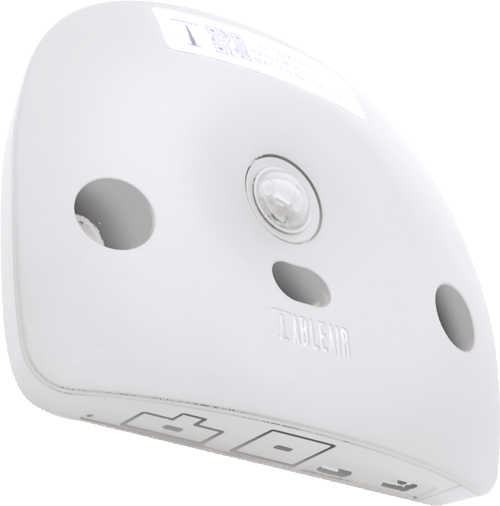
| OS-M Structure | 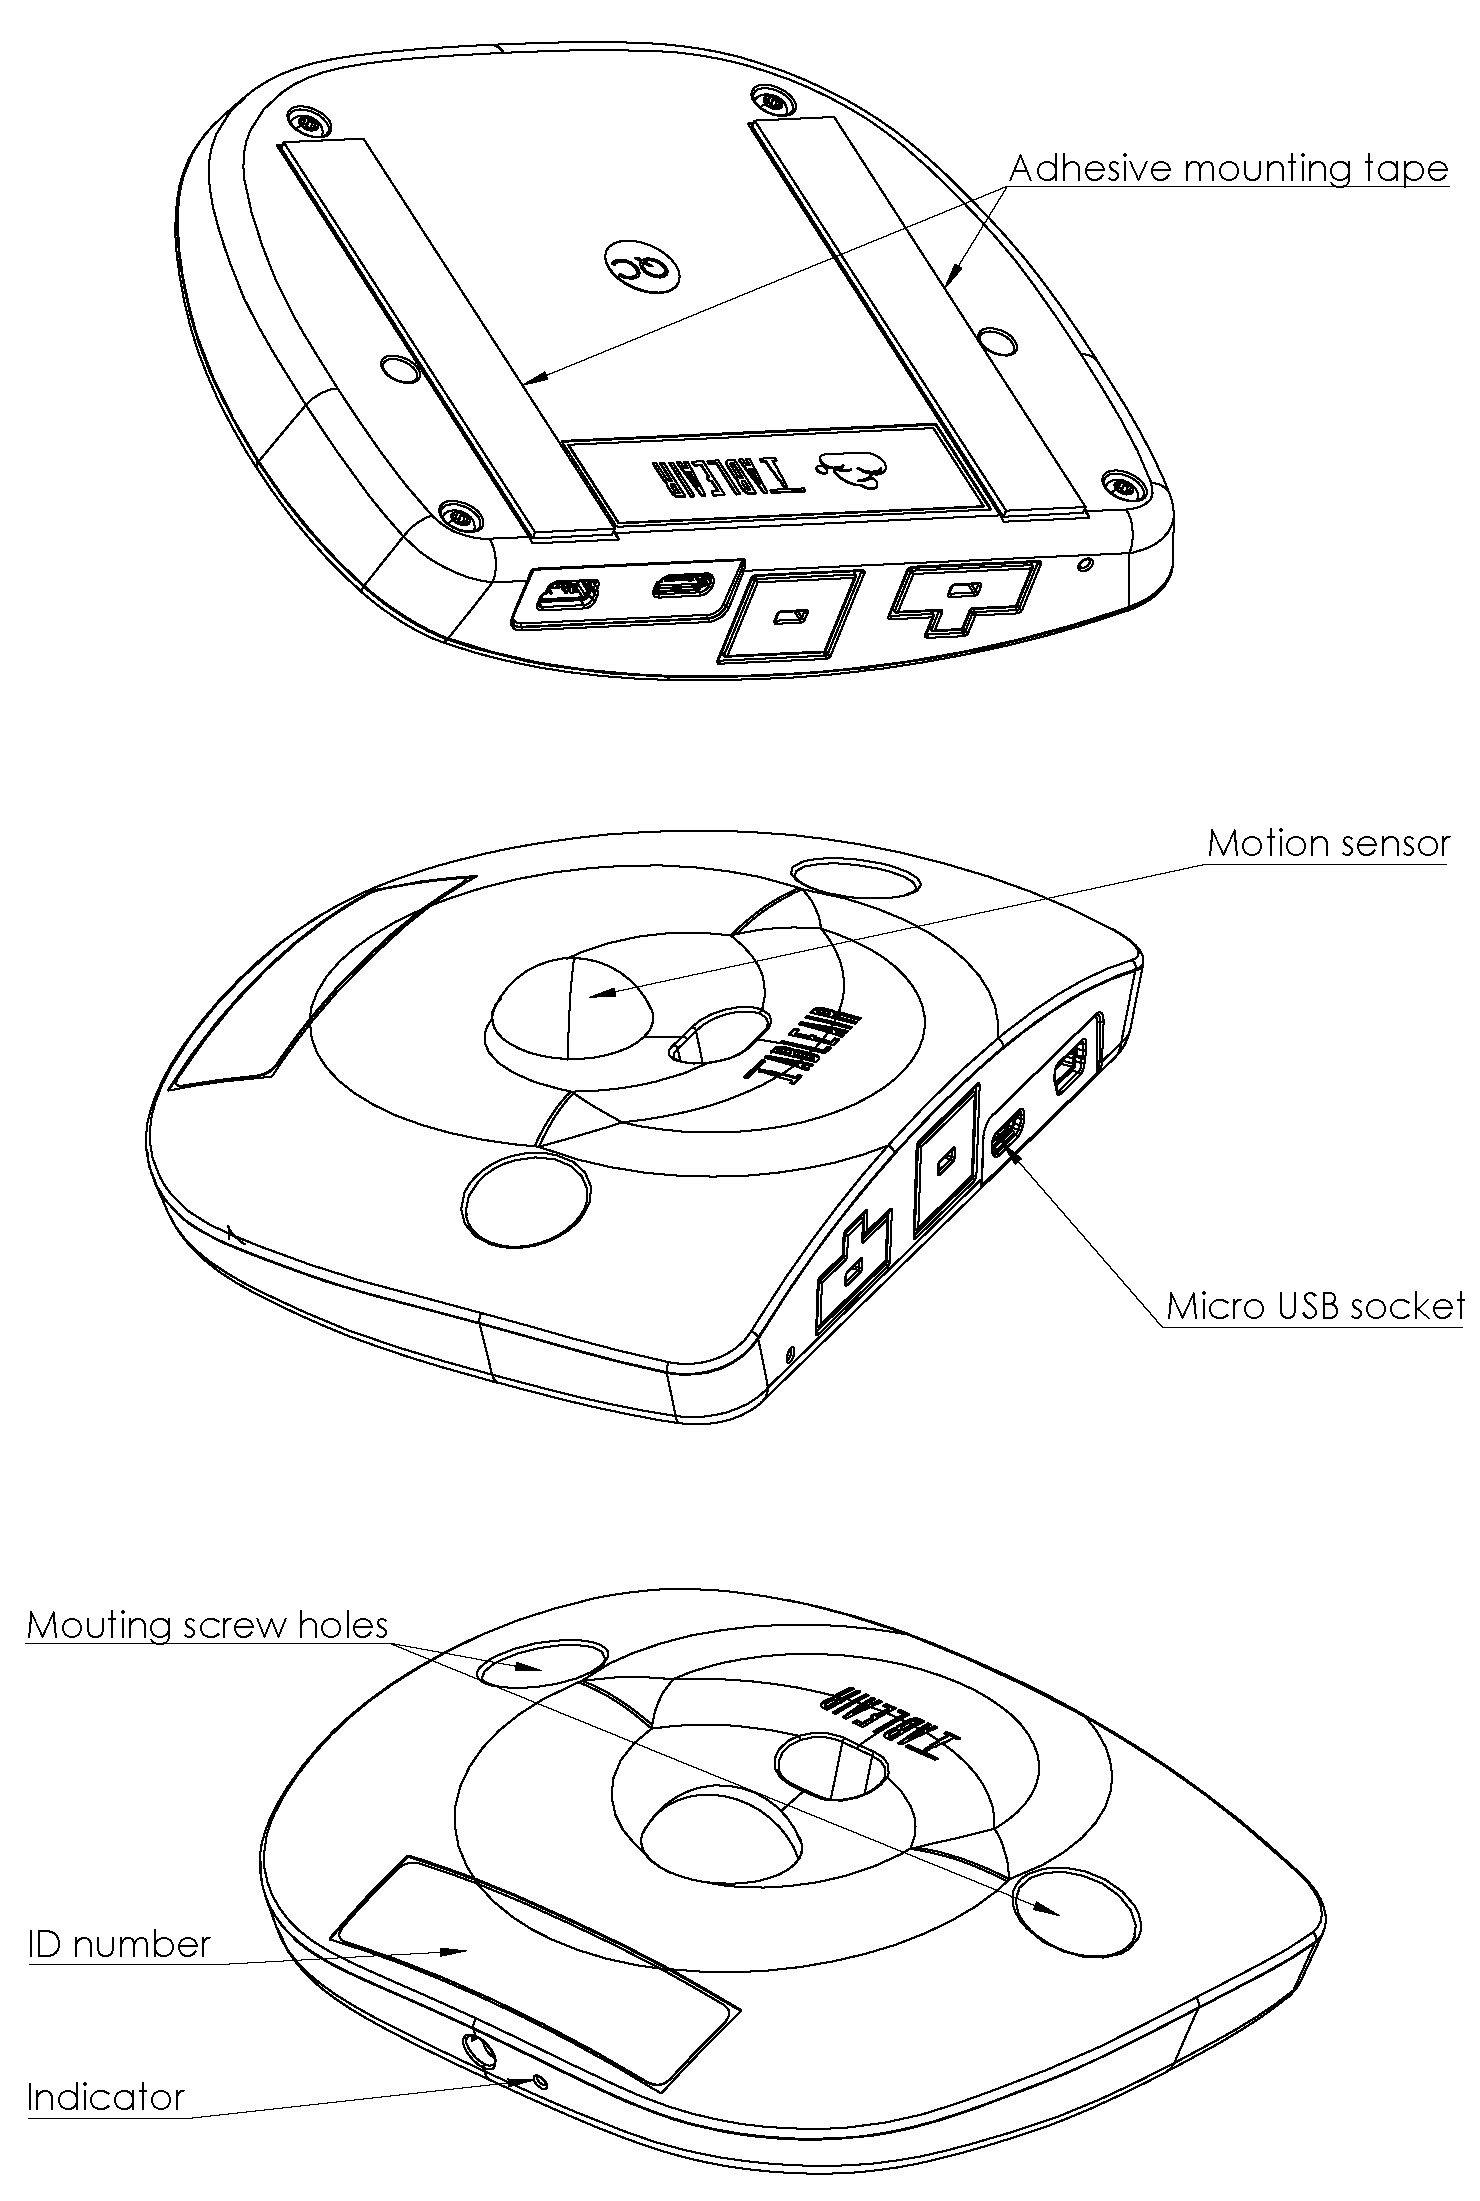 |
Installation requirements
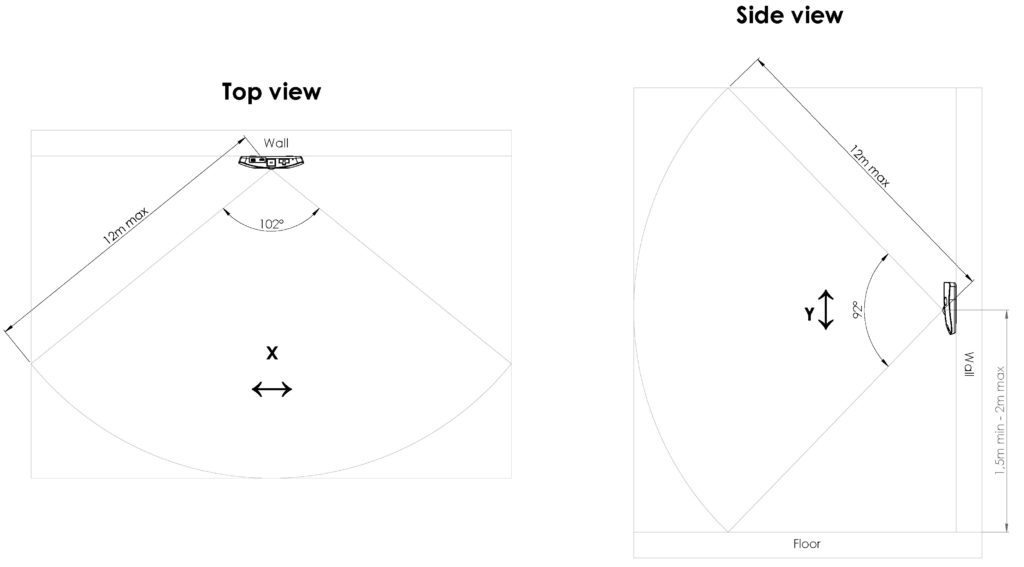
The OS-M presence sensing relies on body motion detection using a motion sensor. To achieve accurate occupancy readings, the sensor must be positioned optimally, primarily determined by the motion sensor’s field of view (FoV) (refer to the picture below). It’s important to note that the sensor cannot detect motion when its FoV is obstructed by walls, glass partitions, or other objects. The FoV for the OS-M depends on its X or Y position. This factor should be taken into consideration when placing the sensor in larger or lower-ceiling rooms. The motion sensor can only detect motion if the object moves along the X and/or Y axes in relation to the sensor. This limitation is significant when mounting the sensor on a wall; in this scenario, the sensor cannot detect movement toward or away from the sensor. As it detects the infrared radiation output from a moving person, the results might also be influenced by the wearer’s clothing.
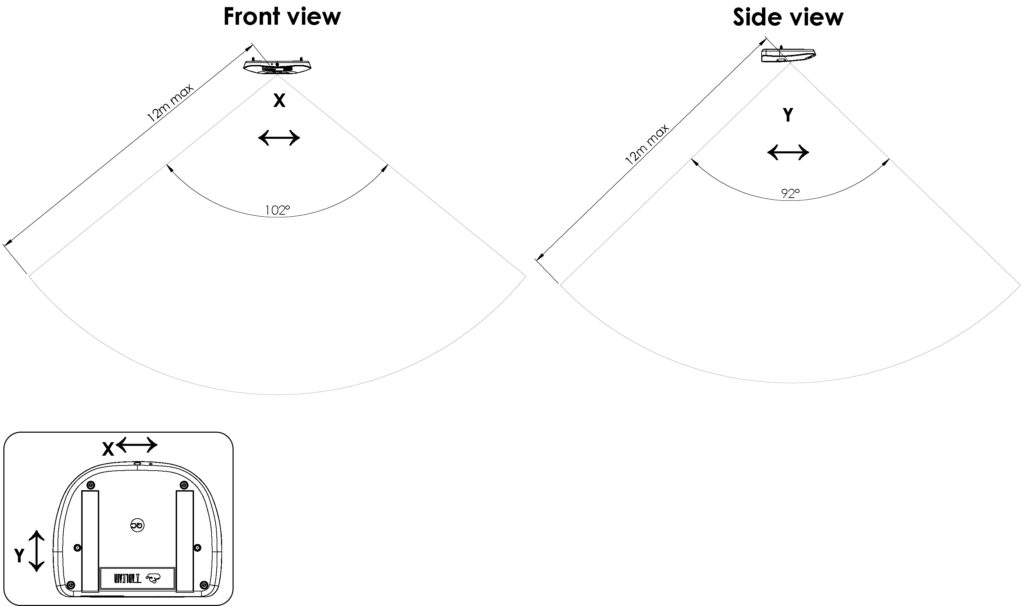
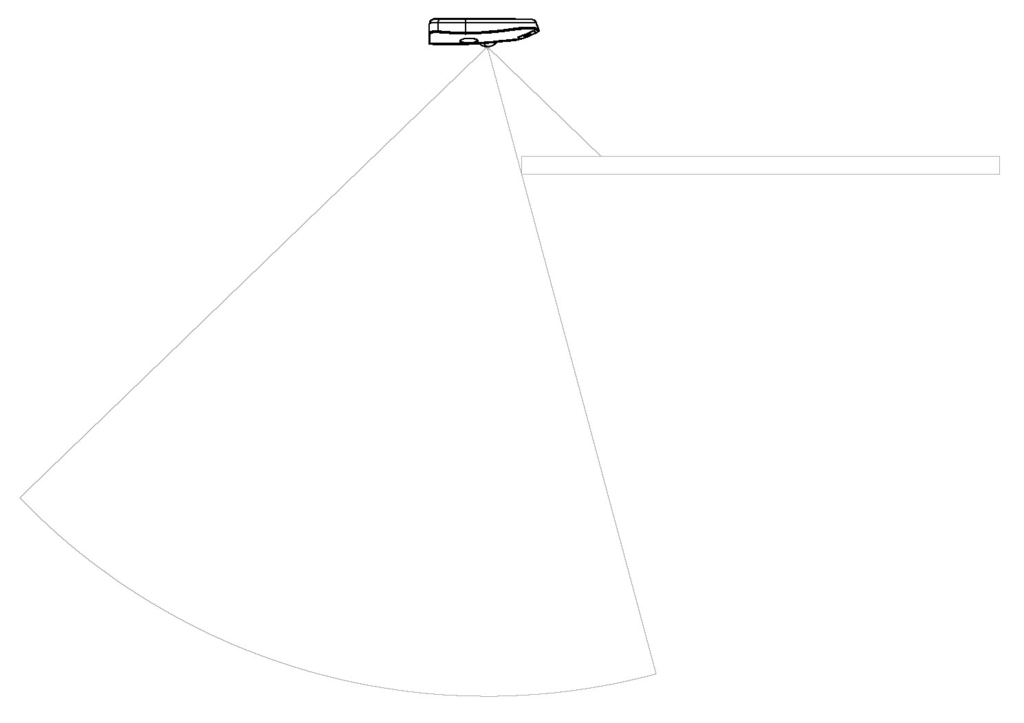
Attention! Any object, especially when located close to the sensor, can have a significant impact on the sensor’s viewing angle (refer to the picture below) and may distort occupancy readings. Please ensure that the sensor is not obstructed by any objects.
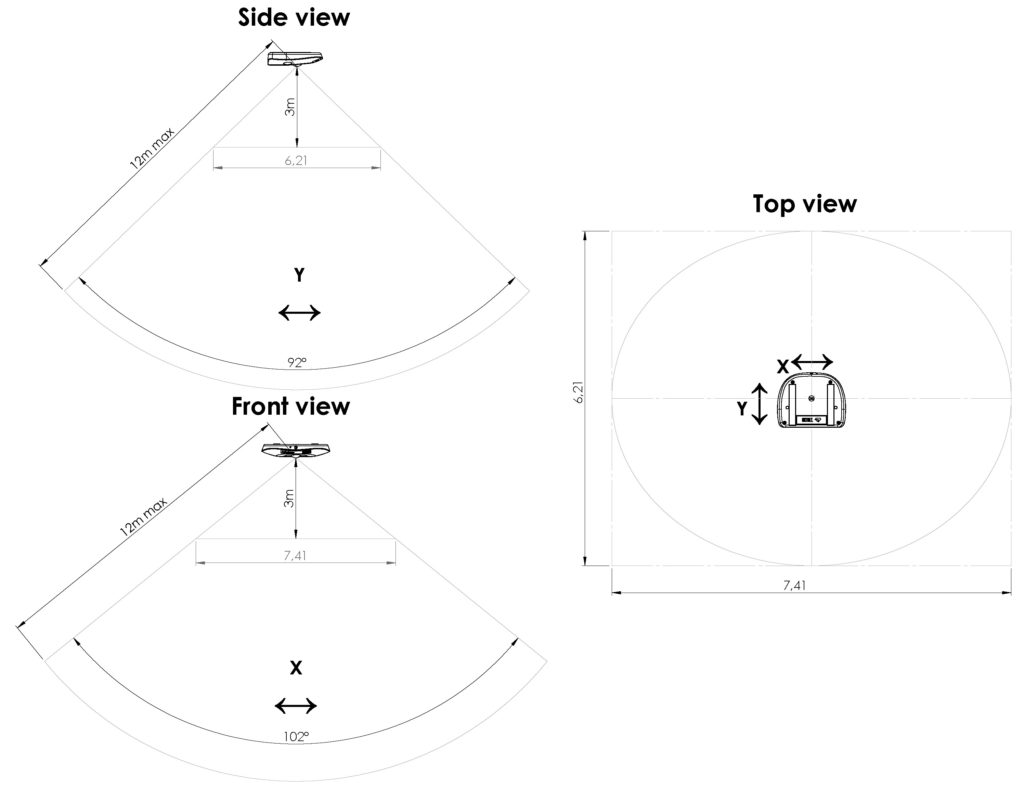
Ceiling mount
The optimal position and angle for the OS-M are determined by aligning the FoV zone with the largest possible area within the room, taking into account the room’s geometry conditions. For instance (refer to the picture below), we calculate the maximum optimal coverage area based on the sensor’s FoV angles and the ceiling height (3m in this example). In this scenario, we observe that the maximum optimal coverage area forms a rectangle measuring 6.21 by 7.41 meters.
Wall mount
Just as in the case of ceiling mounting, it is essential to calculate and determine the optimal placement for the sensor. The sensor’s height should be set between 1.5 to 2 meters, and its FoV should be positioned where it is most probable for people to move along the X or Y axis in relation to the sensor.
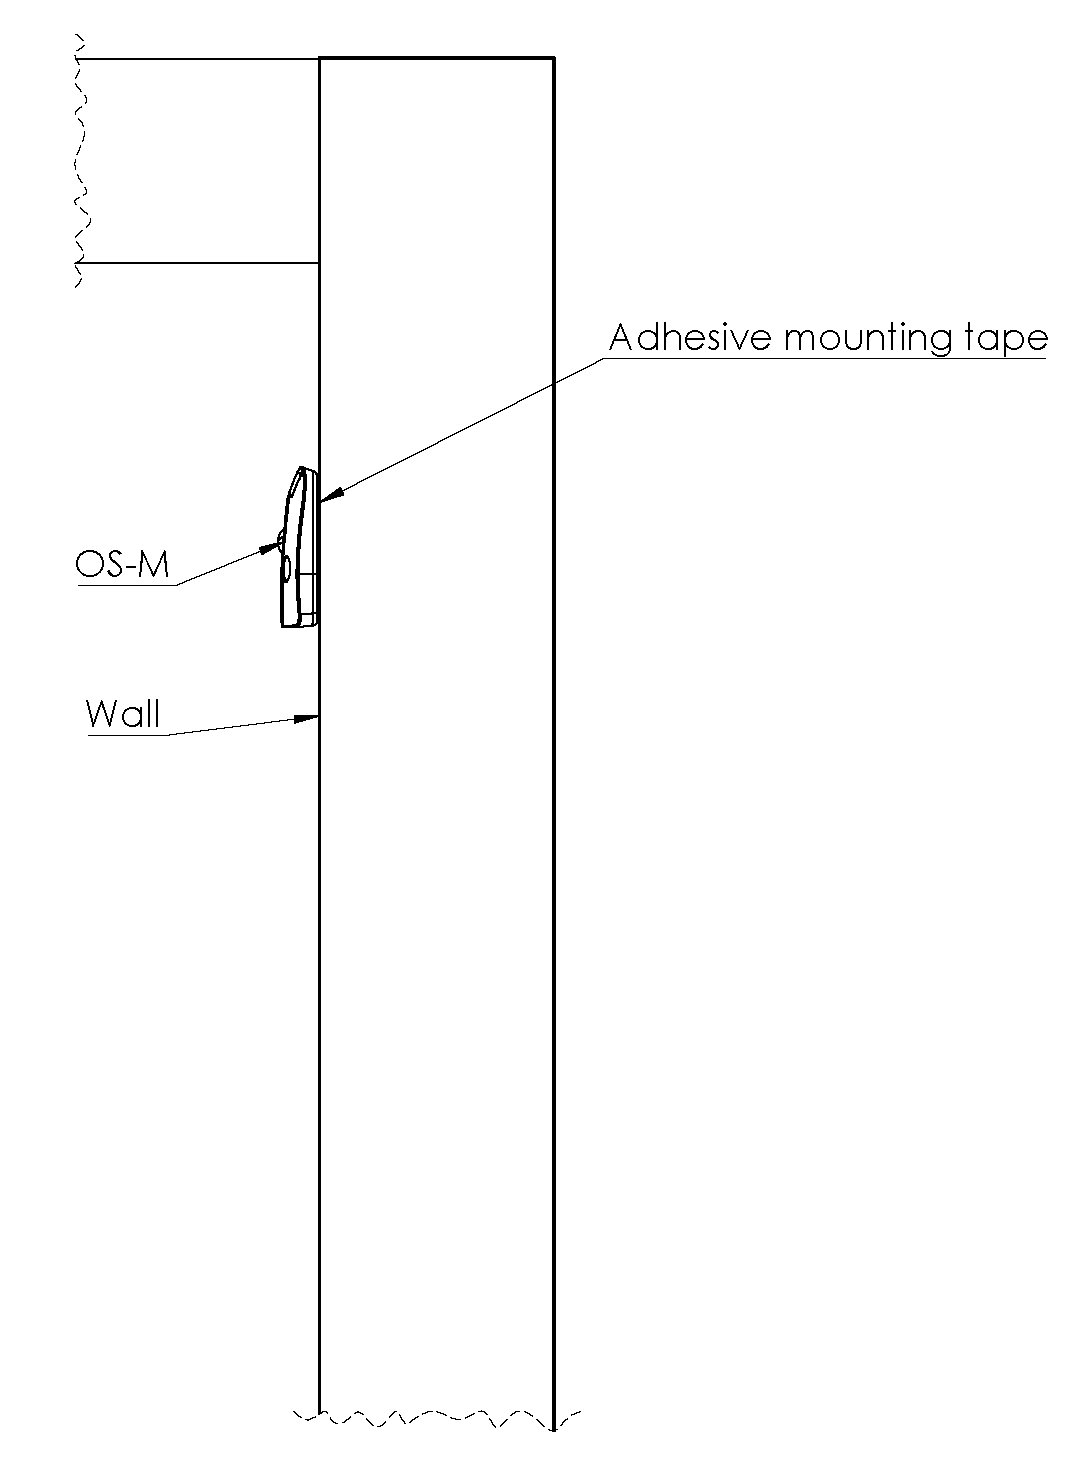
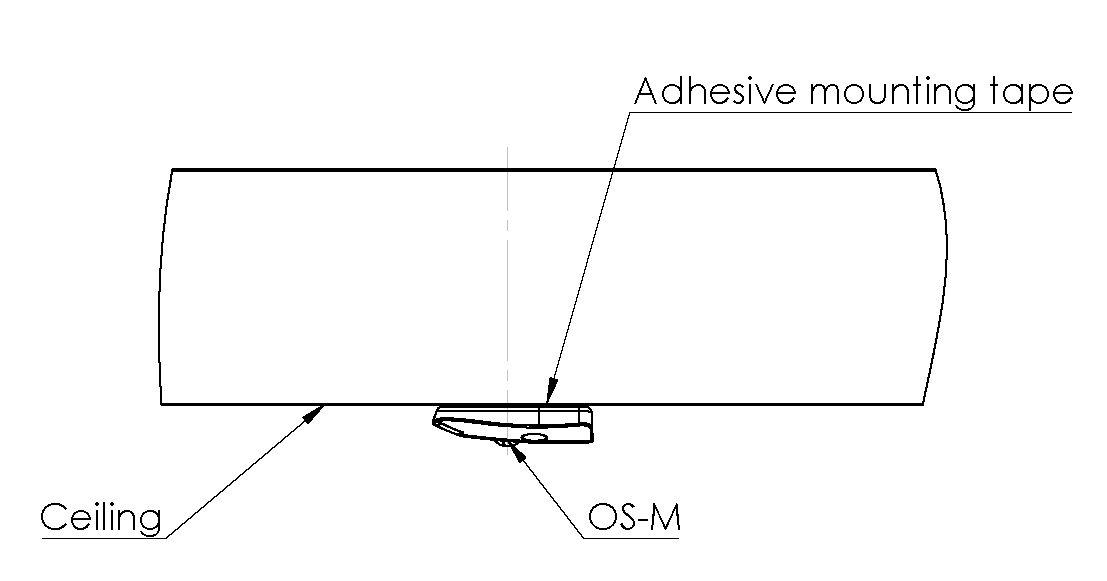
Attaching sensor
The OS-M can be securely mounted on either the wall or the ceiling using adhesive mounting tapes or with 2 pieces of mounting screws. Affix it to the optimal location on the wall or ceiling.
 |
 |
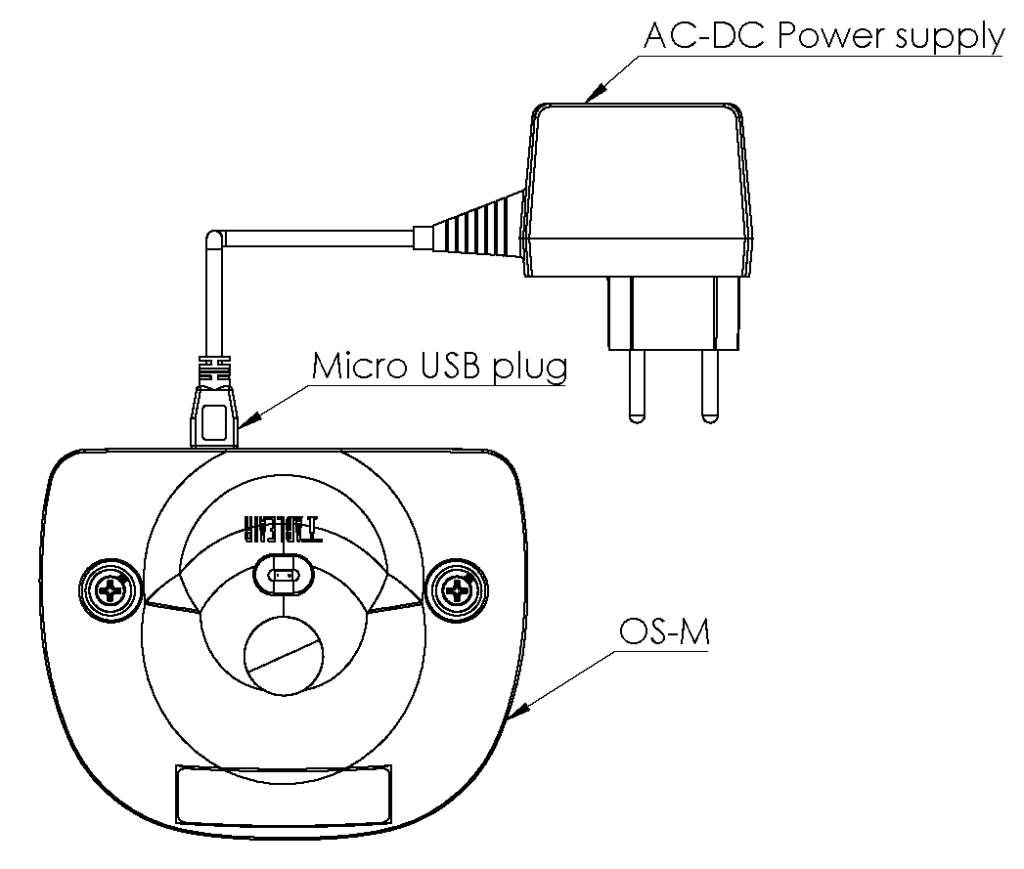
Connecting power supply
Connect the power cable to the OS-M micro USB socket and the AC-DC Power supply.
Attention! The Sensors power cable length is 3 m. This should be considered when installing the OS-M.
Software setup
In order to use OS-M devices you need to have an account and belong to a team. If you are not sure, please contact your supervisor for more information. If you want more information about team creation and app usage please visit our Introduction to TableAir Cloud Manual and the Administrators’ Manual. In order to add sensors to your team you will need to download the TableAir app (either on iPhone or Android device) and you will need to have administrator rights in your team.
Downloading the TableAir Workspace app
Download the TableAir Workspace app on your smartphone device. You can find it on the App Store for iPhone devices and on Google Play for Android devices
Logging into the app
Launch the TableAir Workspace app you have just downloaded and log into your TableAir Cloud account.
Make sure both Bluetooth and WiFi are enabled on your mobile device.
Assigning tables to the venue
After logging into your account, tap on the sandwich menu icon in the top right corner of the app.
Select ‘Connect device’.
You’ll see all the free unassigned tables in the venue. Select the ones you’d like to add to the system and tap ‘Configure’ to proceed.
Select the WiFi network, enter your WiFi passwordand press ‘Connect’.
Select team and venue.
You’ll receive a confirmation message if everything has been done correctly.
Firmware update
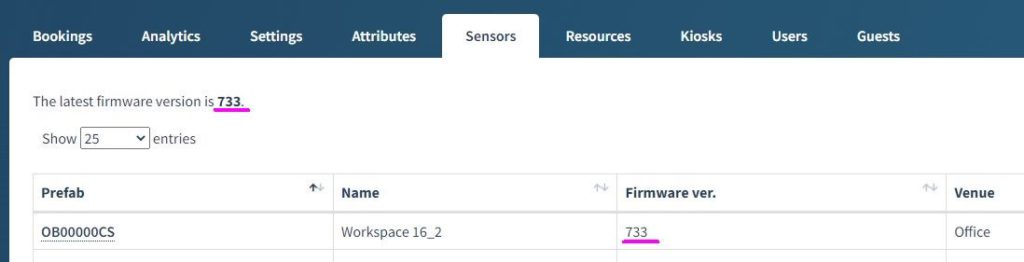
For the device to work properly it must be up to date. Firmware updates are released regularly and upgrade various parts of the device. You can see the latest firmware version in your Dashboard under the Sensors tab.
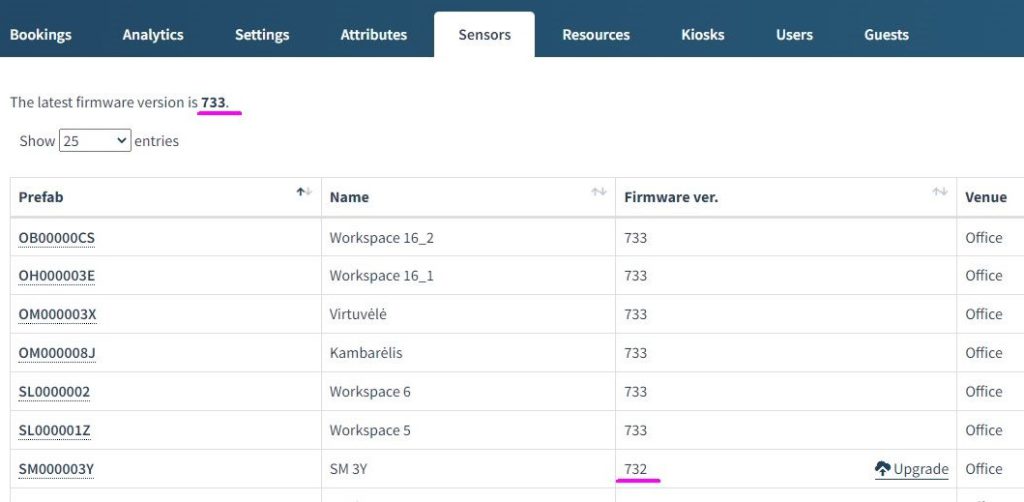
In the same Sensor tab in the Dashboard you are able to see the current firmware version of all of your devices.
Firmware update using the Dashboard
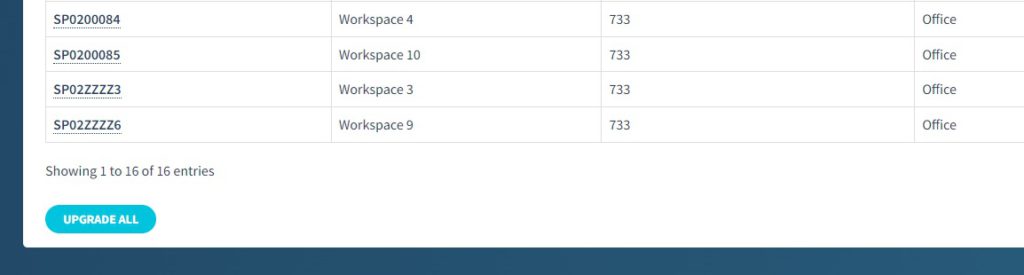
If the device is connected to the Internet and there is a firmware upgrade available, you will see it in the Sensors tab in the Dashboard. Under the Firmware ver. column look for the Upgrade sensor button.
It is also possible to update all of the devices by clicking the UPGRADE ALL button which is located at the bottom of the Sensors tab.