© Copyright UAB “TableAir” 2020
All rights reserved.
No part of this manual may be reproduced in any form, by print, photoprint, microfilm or any other means without written permission from the publisher.
In spite of all care taken in composing the text and illustrations, neither the editor nor the publisher can accept any liability for possible damage that might result from any fault that may be in this publication.
Information in this document is subject to change without notice and does not represent a commitment on the part of TableAir.
User Manual Version History
| Rev. 1.0 | 16th January 2018 | First release |
| Rev. 1.1 | 14th March 2018 | Hidden WiFi network setup added |
| Rev 1.2 | 11th September 2018 | Updated with Traffic Light photos |
| Rev 1.3 | 29th September 2018 | Updated with detailed technical specification |
| Rev 1.4 | 13th March 2019 | SBL added |
| Rev 1.5 | 18th March 2019 | Software setup expanded |
| Rev 1.6 | 20th March 2019 | System architecture attached |
| Rev 1.7 | 29th March 2019 | Group features added |
| Rev 1.8 | 3rd April 2019 | TableAir Cloud setup instruction moved to another user manual |
| Rev 1.9 | 25th September 2019 | General update, some small changes in formulation, error correction |
| Rev 2.0 | 4th June 2020 | Added SBU+ connection instructions to different leg controllers: Linak, Timotion, Jiecang |
Hardware Version History
| Rev B | January 2018 | First production release |
Warnings and Statements
Introduction
The exclamation mark within an equilateral triangle is intended to alert the user to the presence of important operating and maintenance (service) instructions in the literature accompanying the apparatus.
Read this manual before attempting to start up or service the product. Retain the manual for future use. TableAir accepts no responsibility for any consequential loss, failure or damage resulting from a failure to heed any warnings or to follow the instructions.
Warnings
The SBU Plus / Lite may be operated only from the power adapter provided by TableAir. Operation from other supplies is not authorized.
The cables should not exceed 3 m in length.
Warranty and support services
Technical support
Should you need technical assistance please contact “TableAir” UAB.
Tel: +44 20 3322 4746
Email: support@tableair.com Web: www.tableair.com
Return Merchandise Authorization
Please contact via numbers above to receive an RMA number before sending your product back to us for repair. Products sent without an RMA number will be returned to sender.
One-year limited warranty
- This device is guaranteed against manufacturing defects for one full year from the original date of purchase.
- This warranty is valid at the time of purchase and is non-transferable.
- Damage caused by accident, misuse, improper storage, and/or uncertified repairs are not covered by this warranty.
- Warranty is only valid in the country of purchase.
- We assume no liability that may result directly or indirectly from the use or misuse of these products.
Technical Specifications
Smart Button U Plus (SBU Plus) and Smart Button Lite (SBL) technical specifications:
| Specification | Value | |
|---|---|---|
| Environmental | Usage temperature | +20°C to +25°C |
| Storage temperature | 0°C to +40°C | |
| Relative humidity | 5% to 95% (non-condensing) | |
| Dimensions | Length | 97.5mm |
| Width | 63.4mm | |
| Heigth | 31.0mm | |
| RF Operation | Bluetooth | 4.0 LE |
| Wi-Fi | 2.4GHz b/g/n | |
| Antenna | Internal | |
| Power Requirements | Supply Votlage | 5V |
| Operating Current | 1.0A | |
| External Connectors | Control Box* | Molex 10-pin Micro-Fit Header |
| Power | Micro USB | |
| Traffic Light | Mini USB | |
| Ethernet* | RJ45 | |
| Sensors | Distance to ground* | to 2m TOF |
| Occupancy | Thermo & PIR | |
| Indicators | LEDs | Green LED |
| Firmware | Version | 722.01 |
| Accessories | Control Box Cable* | 1m for Linak or Timotion |
| AC/DC power supply | 5V, 10W | |
| USB A to micro USB cable | 1m | |
| Self-adhesive cable holder | 5pcs | |
| Quick start guide | 1pcs | |
| Protection classes | Water Proof | IPX1 |
Software architecture
SBU Plus / SBL (later referred as “The sensors”) can be and in standard application is a part of TableAir Cloud system. The architecture of the system is presented below with the sensor corresponding placement in Sit-stand desk sensors and Fixed desk sensors tables:
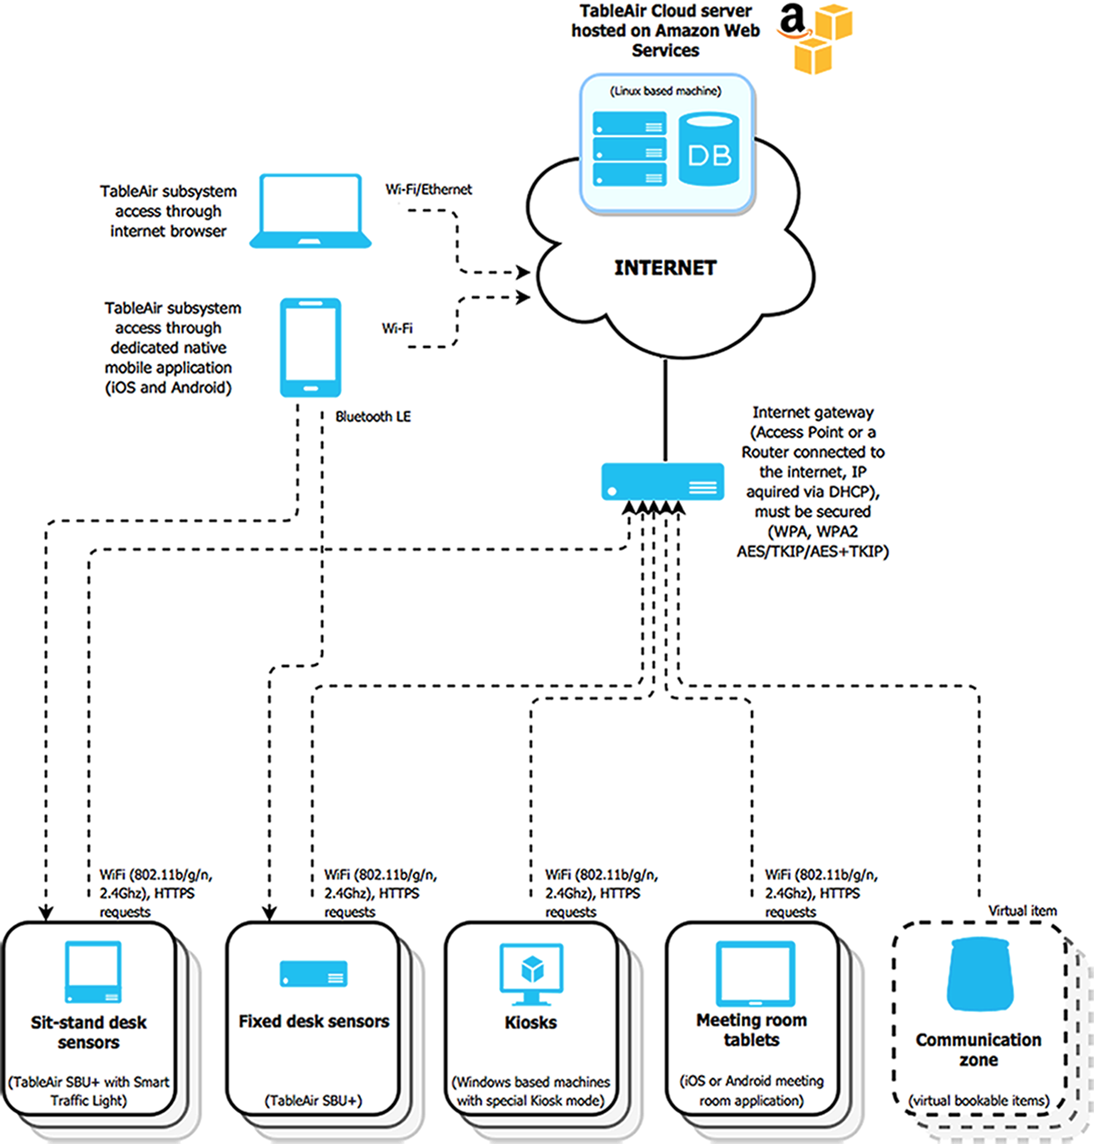
It is also possible to use the sensor in a different architecture environment.
Introduction
The SBU Plus / SBL is designed to detect the occupancy of a desk or workplace position within an office environment and book it.
Occupancy and booking data is transmitted wirelessly or by Ethernet to a central database where it can be used to make informed decisions regarding the workplace utilization and efficiency.
The SBU Plus / SBL can be located up to 30 m away from an Access Point. With objects in the way a more typical range is 15 m. WiFi requirements depend on the number of sensors installed. 10-20 units can be used with a basic router, 20-100 sensors require an enterprise grade router.
This manual details the SBU Plus / SBL installation procedure.
Installation Instructions
| What’s in the box? |  |
| SBU Plus Connectivity |  |
| Traffic Light |  Aluminum body with adhesive tape on the back; ends caped with a discreet plastic holder; |
| AC-DC Power Supply Connectivity Attach an AC plug to the AC-DC Power Supply. Make sure you use a plug that matches the electrical socket used in your country. Attention! Please ensure that the plug is in the right location and fully fixed into the socket. |  |
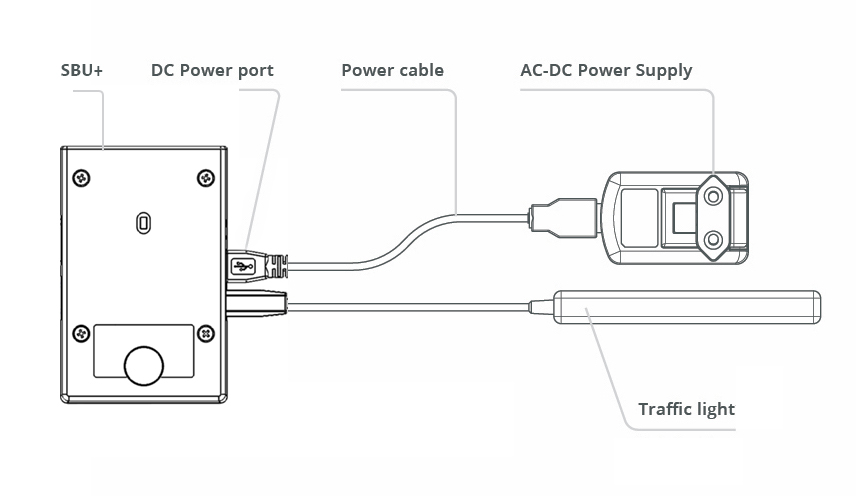
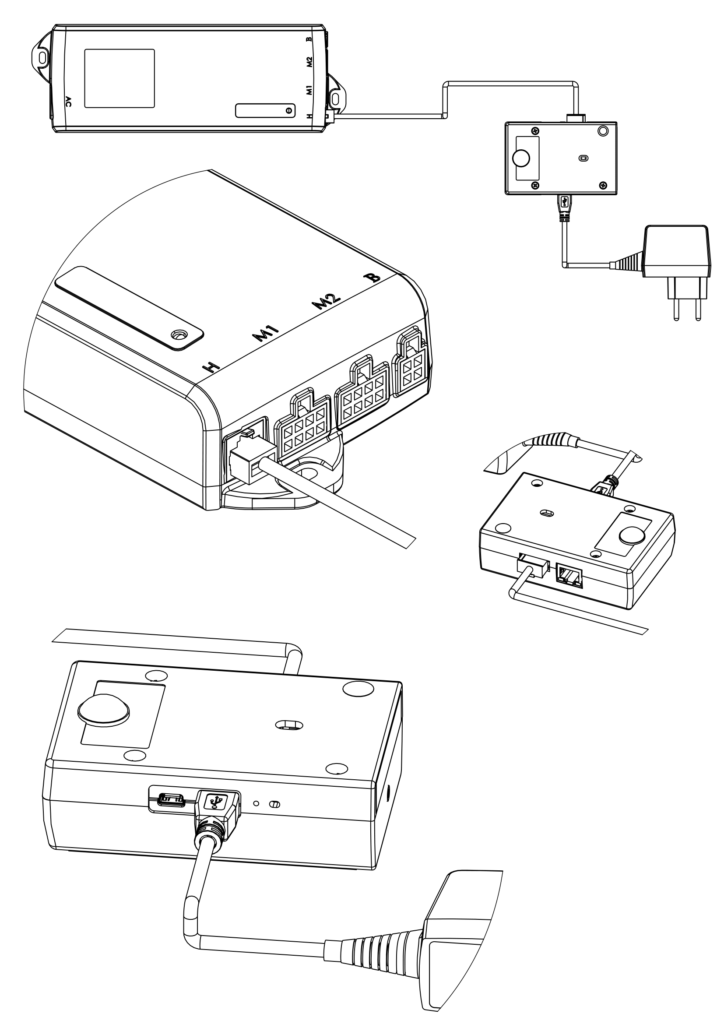
Connecting the system
Connect all cables and devices as shown in the picture below.
- Connect the power cable to the SBU Plus / SBL DC Power port and the AC-DC Power Supply.
- Connect the traffic light cable to the SBU Plus / SBL traffic light port. If the cables require fixing to the table, do so only with self-adhesive cable holders.
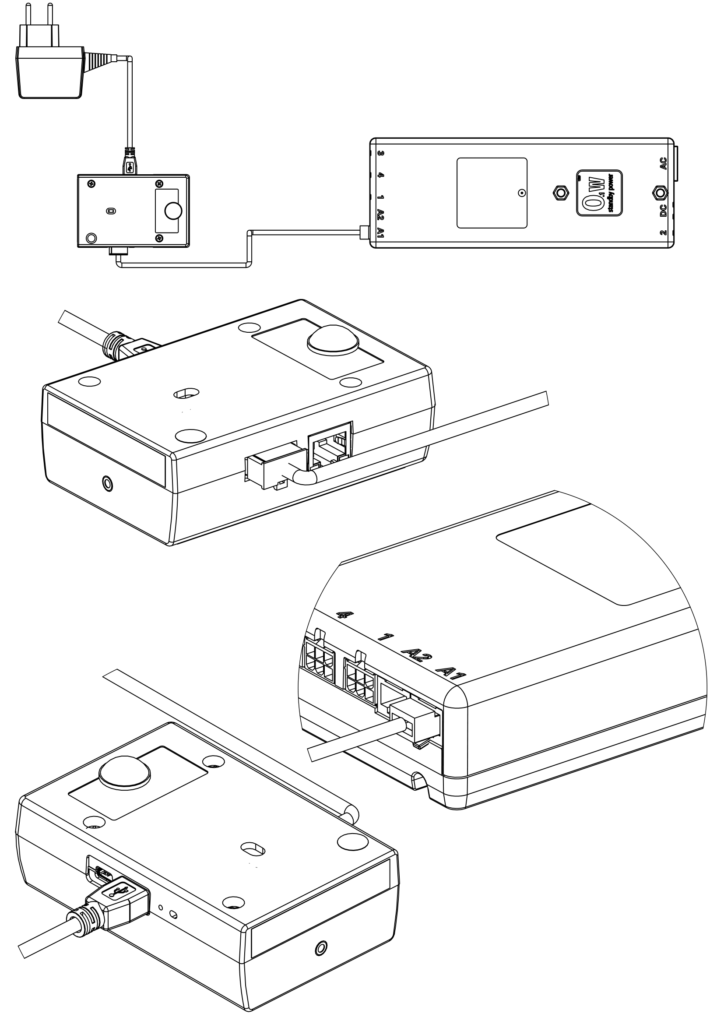
Connecting SBU Plus to Linak leg controller box
Connect the special 8-pin connector to the sensor and the other end, the ethernet connector, to the A1 port of the Linak leg controller box.
Connecting SBU+ to Jiecang leg controller box
Connect the special 8-pin connector to the SBU Plus and the other end, the DSL connector, to the F port of the Jiecang leg controller box.
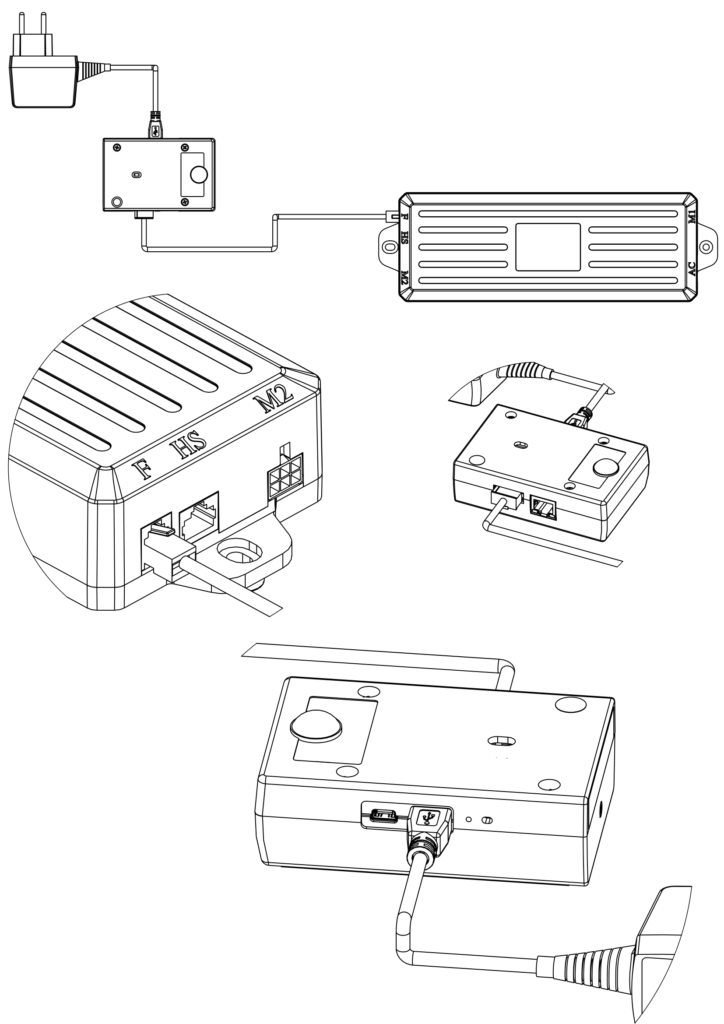
Connecting SBU+ to Timotion leg controller box
Connect the special 8-pin connector to the SBU Plus and the other end to the H port of the Timotion leg controller box.
SBU Plus / SBL installation
The SBU Plus / SBL unit is now ready to be fitted under the desk to monitor the space surrounding it. The SBU Plus / SBL can be fixed under the desk using double-sided adhesive pads.
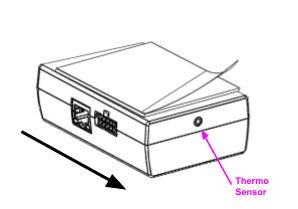
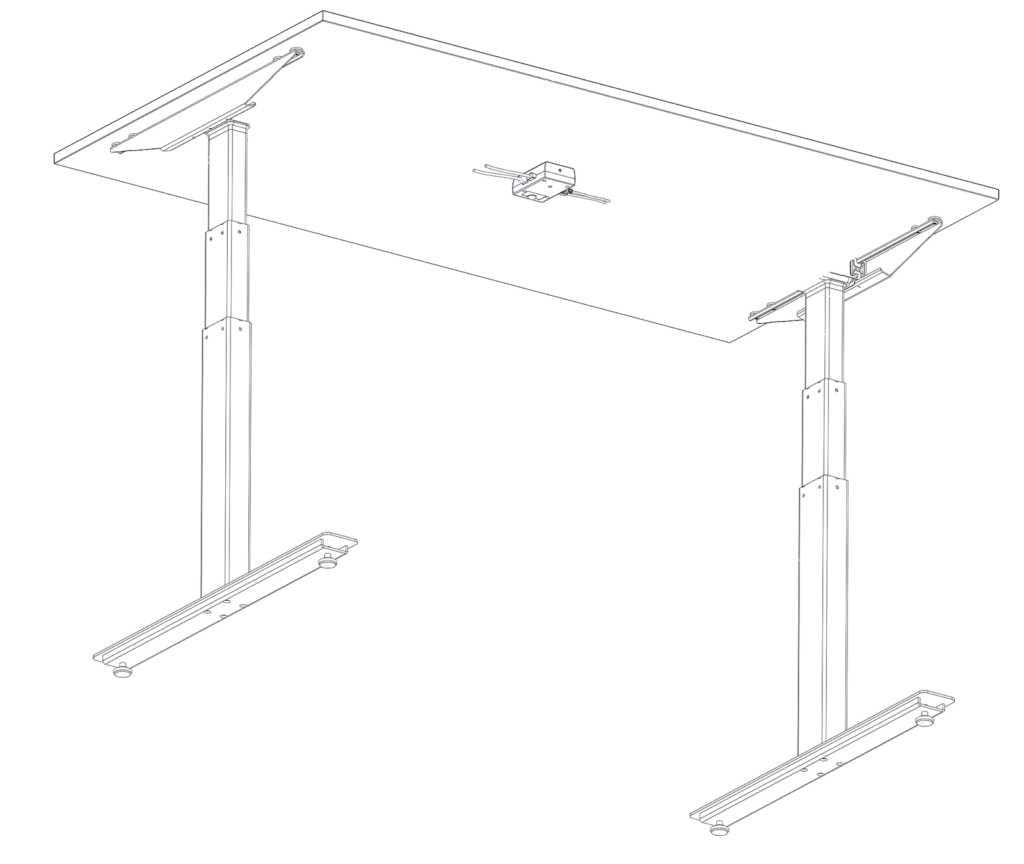
The SBU Plus / SBL must be installed under the desk, 300mm back from the front edge – directly opposite the place where the worker is likely to sit. Make sure the thermo sensor is facing the person.
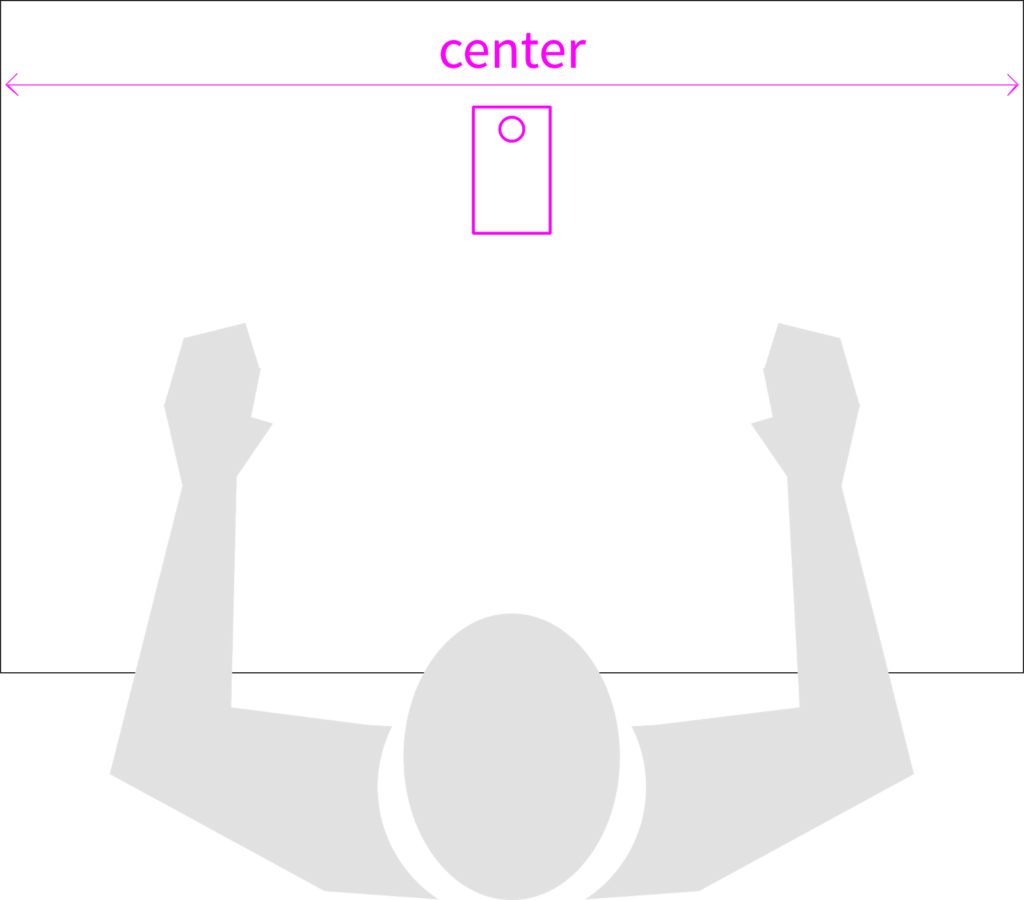
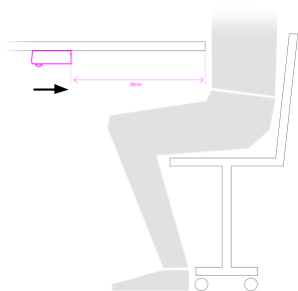
When positioning the SBU Plus / SBL, ensure that the sensors have a clear line-of-sight to the position where the user sits, with no obstructions in the way. Ensure that the SBU Plus / SBL is mounted flat against the underside of the desk. Note that the SBU Plus / SBL has been designed so the sensors point slightly downward by default. This ensures the sensors are pointing down at the workstation occupant, and not upwards towards the underside of the desk.
For correct operation the SBU Plus / SBL requires a normal office environment, with temperatures around 18 to 25 degrees centigrade and normal humidity. Therefore the SBU Plus / SBL should not be placed in direct sunlight or near heat sources such as fan-heaters or radiators.
Software setup
In order to use SBm devices you need to have an account and belong to a team. If you are not sure, please contact your supervisor for more information. If you want more information about team creation and app usage please visit our Introduction to TableAir Cloud Manual and the Administrators’ Manual. In order to add sensors to your team you will need to download the TableAir app (either on iPhone or Android device) and you will need to have administrator rights in your team.
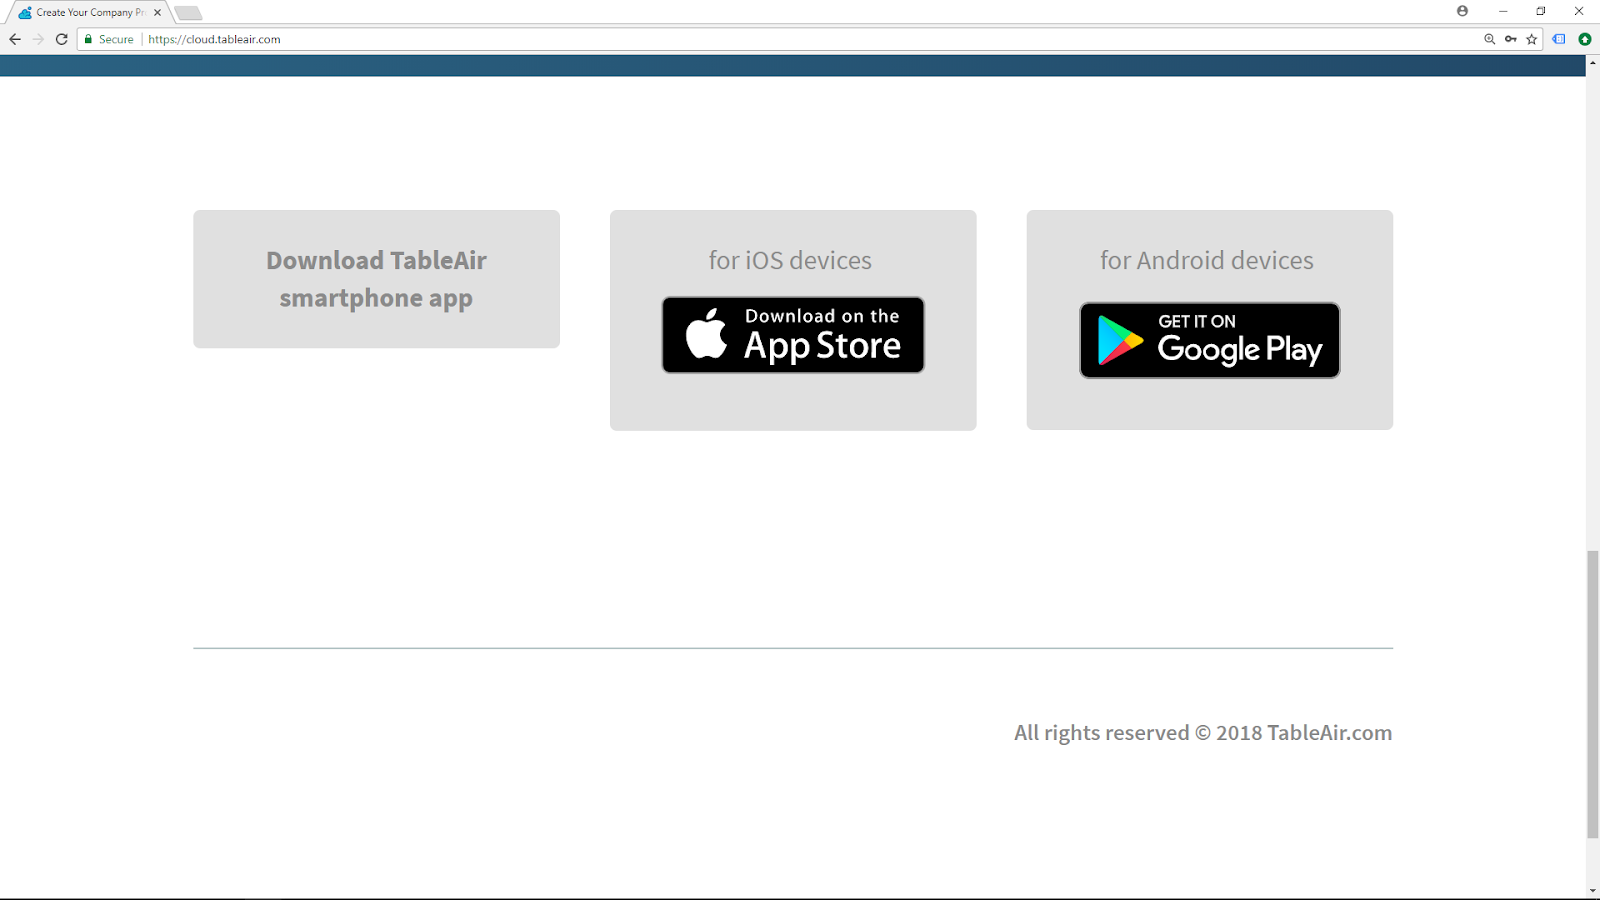
Downloading the TableAir app
Download the TableAir app on your smartphone device. You can find it on the App Store for iPhone devices and on Google Play for Android devices
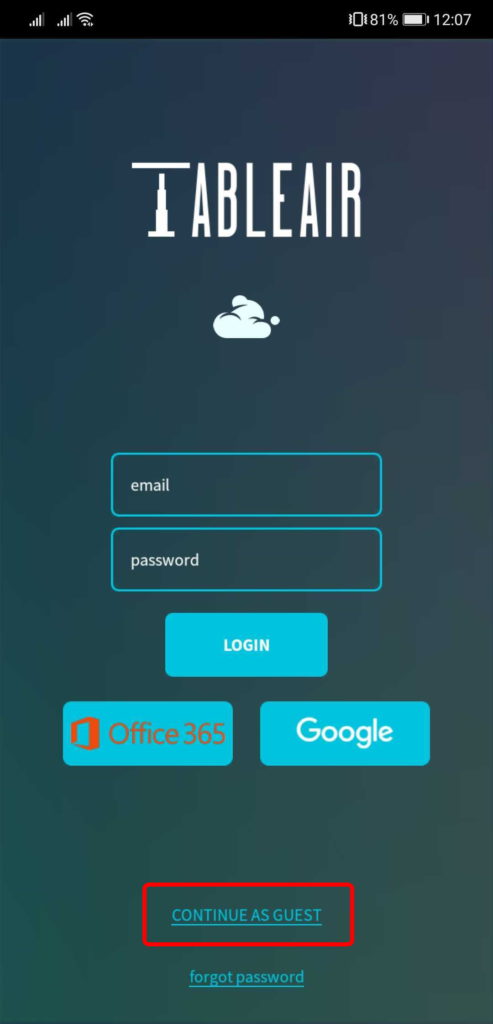
Logging into the app
Launch the TableAir app you have just downloaded and log into your TableAir Cloud account.
Make sure both Bluetooth and WiFi are enabled on your mobile device.
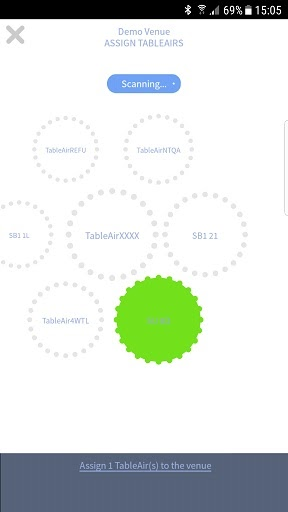
Assigning tables to the venue
After logging into your account, select the team and venue, and then tap on the icon in the bottom left corner of the app.

You’ll see all the free unassigned tables in the venue. Select the ones you’d like to add to the system and tap ‘Assign’ to proceed. All unassigned tables are selected by default.
Select the WiFi network or type the hidden WiFi network name that you want the tables to be assigned to (this will help to track the table usage real-time).

Enter your WiFi password. You’ll receive a confirmation message if everything has been done correctly.
Firmware update
For the device to work properly it must be up to date. Firmware updates are released regularly and upgrade various parts of the device. You can see the latest firmware version in your Dashboard under the Sensors tab.
In the same Sensor tab in the Dashboard you are able to see the current firmware version of all of your devices.

There are a couple of ways to update your firmware.
Firmware update using Bluetooth
If your device is not up to date, once you connect to the device using the TableAir app through Bluetooth you will get a pop-up notifying you about that. You will be prompted to update your device.
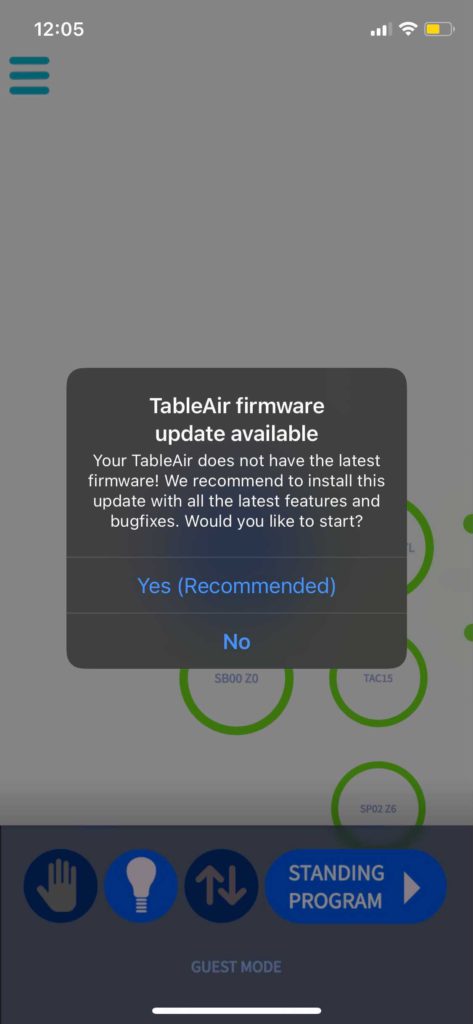
Connecting to the device is possible if you have a booking on that device, so in other terms, checking in. The other way you can connect to a device is by being logged out and using Guest Mode. Once in Guest mode, all of the devices are shown and you can connect to either one of them.
Firmware update using the Dashboard
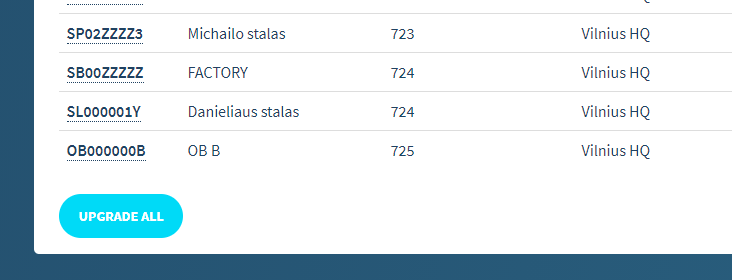
If the device is connected to the Internet and there is a firmware upgrade available, you will see it in the Sensors tab in the Dashboard. Under the Actions column look for the Upgrade sensor button.
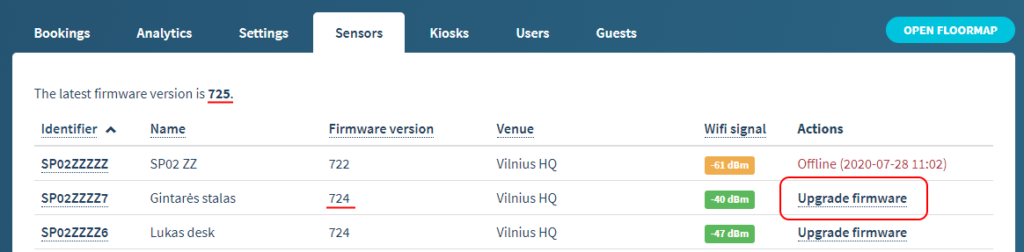
It is also possible to update all of the devices by clicking the UPGRADE ALL button which is located at the bottom of the Sensors tab.